![[리눅스] SSH 접속, 포트포워딩, mount, umount, 고정IP로 변경, genisoimage](https://img1.daumcdn.net/thumb/R750x0/?scode=mtistory2&fname=https%3A%2F%2Fblog.kakaocdn.net%2Fdn%2FsQYu1%2FbtqH8bL8A3r%2Fzo06gffN9vmWz2muXhaJPk%2Fimg.png)
스니핑이란?
: 서로 데이터 훔쳐보기
암호화
: 중간에서 훔쳐봤을 때 데이터를 보호하는 방법
1. 암호화 된 데이터를 복호화해서 원문을 보는 것(데이터 암호화)
데이터 암호화를 하기 위해서는 암호화에 사용된 키를 공유하고 있어야함
2. 프로토콜 자체가 데이터가 지나ㅣ가는 구간 자체를 제 3자가 봤을 때 모르도록 함.
통신채널을 암호화
ex ) ssh, tls,
Client <---------> Ubutu Server
서로 오가는 데이터를 보호하기 위해서
SSH Client SSH Server
~~~~~~~ Putty(인터페이스가 조금 후짐),BItvise
Bitvise SSH Client Download
https://www.bitvise.com/ssh-client-download ⇐ 다운로드 페이지
https://dl.bitvise.com/BvSshClient-Inst.exe ⇐ 설치 파일 다운로드
Client <-----------> Ubuntu Server
SSH Client SSH Server
~~~~~~~~~~ Putty
#1 Ubuntu Desktop IP 확인
ubuntu@server:~$ ip a
1: lo: <LOOPBACK,UP,LOWER_UP> mtu 65536 qdisc noqueue state UNKNOWN group default qlen 1000
link/loopback 00:00:00:00:00:00 brd 00:00:00:00:00:00
inet 127.0.0.1/8 scope host lo
valid_lft forever preferred_lft forever
inet6 ::1/128 scope host
valid_lft forever preferred_lft forever
2: enp0s3: <BROADCAST,MULTICAST,UP,LOWER_UP> mtu 1500 qdisc fq_codel state UP group default qlen 1000
link/ether 08:00:27:96:b2:75 brd ff:ff:ff:ff:ff:ff
inet 10.0.2.4/24 brd 10.0.2.255 scope global dynamic noprefixroute enp0s3
valid_lft 507sec preferred_lft 507sec
inet6 fe80::2e79:698a:dba3:9968/64 scope link noprefixroute
valid_lft forever preferred_lft forever
#2 Ubuntu Server IP 확인

#3 Ubuntu Desktop에서 Ubuntu Server로 SSH 접속
ubuntu@server:~$ ssh 10.0.2.6 ⇐ Ubuntu Server IP
The authenticity of host '10.0.2.5 (10.0.2.5)' can't be established.
ECDSA key fingerprint is SHA256:XsaQWtyiPJhtxTjcUYaMF3sFuYDq2WzSanz4HPEf5DY.
Are you sure you want to continue connecting (yes/no)? yes
Warning: Permanently added '10.0.2.6' (ECDSA) to the list of known hosts.
ubuntu@10.0.2.5's password: ubuntu ⇐ Ubuntu Server Password
Welcome to Ubuntu 18.04.4 LTS (GNU/Linux 4.15.0-115-generic x86_64)
* Documentation: https://help.ubuntu.com
* Management: https://landscape.canonical.com
* Support: https://ubuntu.com/advantage
System information as of Mon Sep 7 00:17:10 UTC 2020
System load: 0.0 Processes: 87
Usage of /: 20.2% of 19.56GB Users logged in: 1
Memory usage: 8% IP address for enp0s3: 10.0.2.5
Swap usage: 0%
65 packages can be updated.
0 updates are security updates.
Last login: Mon Sep 7 00:01:19 2020
ubuntu@server-b:~$ ip a
1: lo: <LOOPBACK,UP,LOWER_UP> mtu 65536 qdisc noqueue state UNKNOWN group default qlen 1000
link/loopback 00:00:00:00:00:00 brd 00:00:00:00:00:00
inet 127.0.0.1/8 scope host lo
valid_lft forever preferred_lft forever
inet6 ::1/128 scope host
valid_lft forever preferred_lft forever
2: enp0s3: <BROADCAST,MULTICAST,UP,LOWER_UP> mtu 1500 qdisc fq_codel state UP group default qlen 1000
link/ether 08:00:27:d9:ce:01 brd ff:ff:ff:ff:ff:ff
inet 10.0.2.6/24 brd 10.0.2.255 scope global dynamic enp0s3
valid_lft 427sec preferred_lft 427sec
inet6 fe80::a00:27ff:fed9:ce01/64 scope link
valid_lft forever preferred_lft forever
ubuntu@server-b:~$ hostname
server-b
#4 Ubuntu Desktop에 SSH Server를 설치
$ sudo su
# apt update
# apt upgrade
# apt install openssh-server
|
아래 오류가 발생하는 경우 openssh-server : 의존: openssh-client (= 1:7.2p2-4) 의존: openssh-sftp-server 하지만 %s 패키지를 설치하지 않을 것입니다 추천: ssh-import-id 하지만 %s 패키지를 설치하지 않을 것입니다 # apt install openssh-client=1:7.2p2-4 # apt install openssh-server |
#5 Ubuntu Server에서 Ubuntu Desktop으로 SSH 접속

#6 Host PC에서 Ubuntu Desktop으로 SSH 접속
#6-1 명령어창을 실행한 후 Ubuntu Desktop으로 접속
C:\Users\myanj> ssh 10.0.2.4
ssh: connect to host 10.0.2.4 port 22: Connection timed out
#6-2 포트 포워딩 설정
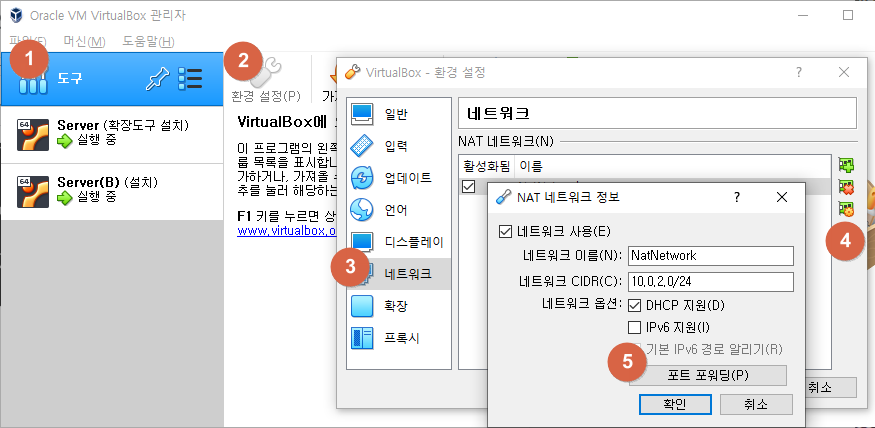

-
호스트 IP : Host PC (자기 PC)의 IP
-
호스트 포트 : Host PC에서 사용하는 포트 번호
-
게스트 IP : 서비스를 제공할 가상 머신의 IP
-
게시트 포트 : 가상 머신에서 서비스를 제공에 사용하는 포트 번호
C:\Users\myanj> ssh 192.168.0.218 -p 22 ⇒ 명령어 오류 발생 시 https://charging.tistory.com/94 참조
The authenticity of host '192.168.0.218 (192.168.0.218)' can't be established.
ECDSA key fingerprint is SHA256:3yvF5H+nWFHo9yvJPrHT20AA7DErN5w+g6WXN7KaUIg.
Are you sure you want to continue connecting (yes/no)? yes
Warning: Permanently added '192.168.0.218' (ECDSA) to the list of known hosts.
myanj@192.168.0.218's password: ⇐ 접속 시 사용자를 지정하지 않으면 호스트 PC의 사용자로 접속
C:\Users\myanj> ssh ubuntu@192.168.0.218 -p 22 ⇐ ubuntu 사용자로 접속
ubuntu@192.168.0.218's password: ubuntu
Welcome to Ubuntu 18.04.5 LTS (GNU/Linux 5.4.0-45-generic x86_64)
* Documentation: https://help.ubuntu.com
* Management: https://landscape.canonical.com
* Support: https://ubuntu.com/advantage
* Canonical Livepatch is available for installation.
- Reduce system reboots and improve kernel security. Activate at:
패키지 0개를 업데이트할 수 있습니다.
0 업데이트는 보안 업데이트입니다.
Your Hardware Enablement Stack (HWE) is supported until April 2023.
*** 시스템을 다시 시작해야 합니다 ***
Last login: Mon Sep 7 09:27:08 2020 from 10.0.2.5
ubuntu@server:~$ ⇐ Ubuntu Desktop으로 접속
#6-3 Bitvise SSH Client를 이용해서 접속

Last login: Mon Sep 7 10:33:31 2020 from 192.168.0.218
ubuntu@server:~$ ip a
1: lo: <LOOPBACK,UP,LOWER_UP> mtu 65536 qdisc noqueue state UNKNOWN group default qlen 1000
link/loopback 00:00:00:00:00:00 brd 00:00:00:00:00:00
inet 127.0.0.1/8 scope host lo
valid_lft forever preferred_lft forever
inet6 ::1/128 scope host
valid_lft forever preferred_lft forever
2: enp0s3: <BROADCAST,MULTICAST,UP,LOWER_UP> mtu 1500 qdisc fq_codel state UP group default qlen 1000
link/ether 08:00:27:96:b2:75 brd ff:ff:ff:ff:ff:ff
inet 10.0.2.4/24 brd 10.0.2.255 scope global dynamic noprefixroute enp0s3
valid_lft 380sec preferred_lft 380sec
inet6 fe80::2e79:698a:dba3:9968/64 scope link noprefixroute
valid_lft forever preferred_lft forever
ubuntu@server:~$
문제: 호스트 PC에서 Ubuntu Server로 SSH 접속해 보세요.


서버 쓰는 사람들에게 메세지를 주기 위해 쓰는 명령어가
shutdown -k 명령어 이다.
실제로 종료되진 않는다.

가상콘솔
ctrl + alt + F1 ~ F7
#7 호스트 PC에서 Ubuntu Server로 SSH 접속
#7-1 포트 포워딩 정보를 추가

#7-2 SSH 접속
C:\Users\myanj> ssh ubuntu@192.168.0.218 -p 222
The authenticity of host '[192.168.0.218]:222 ([192.168.0.218]:222)' can't be established.
ECDSA key fingerprint is SHA256:XsaQWtyiPJhtxTjcUYaMF3sFuYDq2WzSanz4HPEf5DY.
Are you sure you want to continue connecting (yes/no)? yes
Warning: Permanently added '[192.168.0.218]:222' (ECDSA) to the list of known hosts.
ubuntu@192.168.0.218's password: ubuntu
Welcome to Ubuntu 18.04.4 LTS (GNU/Linux 4.15.0-115-generic x86_64)Welcome to Ubuntu 18.04.4 LTS (GNU/Linux 4.15.0-115-generic x86_64)
* Documentation: https://help.ubuntu.com
* Management: https://landscape.canonical.com
* Support: https://ubuntu.com/advantage
System information as of Mon Sep 7 02:04:13 UTC 2020
System load: 0.0 Processes: 86
Usage of /: 20.2% of 19.56GB Users logged in: 1
Memory usage: 8% IP address for enp0s3: 10.0.2.5
Swap usage: 0%
* Kubernetes 1.19 is out! Get it in one command with:
sudo snap install microk8s --channel=1.19 --classic
https://microk8s.io/ has docs and details.
65 packages can be updated.
0 updates are security updates.
Last login: Mon Sep 7 00:22:51 2020 from 10.0.2.4
ubuntu@server-b:~$
리눅스 기본 명령어
3장 ⇒ https://docs.google.com/presentation/d/1RwiwiFaWL9ovO4Kl9WOhnXDJKUdF0QlnqrJy3TSpujg/edit?usp=sharing
4장 ⇒ https://docs.google.com/presentation/d/1OX47wMg9AzOov3VdEvF6u1BIoBV5B45tKahPFL2361Y/edit?usp=sharing
런레벨 확인 및 변경
런레벨 파일 확인
root@server:~# ls -al /lib/systemd/system/runlevel?.target
lrwxrwxrwx 1 root root 15 7월 9 03:59 /lib/systemd/system/runlevel0.target -> poweroff.target
lrwxrwxrwx 1 root root 13 7월 9 03:59 /lib/systemd/system/runlevel1.target -> rescue.target
lrwxrwxrwx 1 root root 17 7월 9 03:59 /lib/systemd/system/runlevel2.target -> multi-user.target
lrwxrwxrwx 1 root root 17 7월 9 03:59 /lib/systemd/system/runlevel3.target -> multi-user.target
lrwxrwxrwx 1 root root 17 7월 9 03:59 /lib/systemd/system/runlevel4.target -> multi-user.target
lrwxrwxrwx 1 root root 16 7월 9 03:59 /lib/systemd/system/runlevel5.target -> graphical.target
lrwxrwxrwx 1 root root 13 7월 9 03:59 /lib/systemd/system/runlevel6.target -> reboot.target
root@server:~# ls -al /lib/systemd/system/default.target
lrwxrwxrwx 1 root root 16 7월 9 03:59 /lib/systemd/system/default.target -> graphical.target
default.target을 변경
root@server:~# ls -al /lib/systemd/system/default.target
lrwxrwxrwx 1 root root 16 7월 9 03:59 /lib/systemd/system/default.target -> graphical.target
root@server:~# ln -sf /lib/systemd/system/multi-user.target /lib/systemd/system/default.target
root@server:~# ls -al /lib/systemd/system/default.target
lrwxrwxrwx 1 root root 37 9월 7 11:33 /lib/systemd/system/default.target -> /lib/systemd/system/multi-user.target
재실행
root@server:~# reboot
CLI 형태로 실행되는 것을 확인

로그인 후 startx 명령어를 이용해서 X Window 환경을 이용
터미널에서 default.target을 변경 후 reboot
ubuntu@server:~$ sudo ln -sf /lib/systemd/system/graphical.target /lib/systemd/system/default.target
[sudo] ubuntu의 암호: ubuntu
ubuntu@server:~$ ls -al /lib/systemd/system/default.target
lrwxrwxrwx 1 root root 36 9월 7 11:38 /lib/systemd/system/default.target -> /lib/systemd/system/graphical.target
ubuntu@server:~$ sudo reboot
GUI 형태로 실행되는 것을 확인
사용자를 구분 ⇒ $: 일반사용자, #: 루트사용자
-
ubuntu@server:~$ ls -al /lib/systemd/system/default.target
------ ------ - ~~~~~~~~~~~~~~~~~~~~~~~~~~~~~~ 명령어 ⇒ 명령어 [서브명령어] [옵션] [파라미터]
| | |
| | +--- 현재 명령어를 입력하고 있는 위치 (디렉터리)
| | ~ ⇒ 로그인한 계정(사용자)의 홈 디렉터리 ⇒ root → /root, 일반사용자 → /home/계정명
| +--------- 호스트 명
+---------------- 로그인한 계정
명령어 사용법을 확인
방법1. --help 옵션을 이용
ubuntu@server:~$ ls --help
사용법: ls [<옵션>]... [<파일>]...
List information about the FILEs (the current directory by default).
Sort entries alphabetically if none of -cftuvSUX nor --sort is specified.
Mandatory arguments to long options are mandatory for short options too.
-a, --all do not ignore entries starting with .
-A, --almost-all do not list implied . and ..
--author with -l, print the author of each file
-b, --escape print C-style escapes for nongraphic characters
--block-size=SIZE scale sizes by SIZE before printing them; e.g.,
'--block-size=M' prints sizes in units of
1,048,576 bytes; see SIZE format below
-B, --ignore-backups do not list implied entries ending with ~
-c with -lt: sort by, and show, ctime (time of last
modification of file status information);
with -l: show ctime and sort by name;
otherwise: sort by ctime, newest first
-C list entries by columns
--color[=WHEN] colorize the output; WHEN can be 'always' (default
if omitted), 'auto', or 'never'; more info below
-d, --directory list directories themselves, not their contents
-D, --dired generate output designed for Emacs' dired mode
-f do not sort, enable -aU, disable -ls --color
-F, --classify append indicator (one of */=>@|) to entries
--file-type likewise, except do not append '*'
--format=WORD across -x, commas -m, horizontal -x, long -l,
single-column -1, verbose -l, vertical -C
--full-time like -l --time-style=full-iso
-g like -l, but do not list owner
--group-directories-first
group directories before files;
can be augmented with a --sort option, but any
use of --sort=none (-U) disables grouping
-G, --no-group in a long listing, don't print group names
-h, --human-readable with -l and/or -s, print human readable sizes
(e.g., 1K 234M 2G)
--si likewise, but use powers of 1000 not 1024
-H, --dereference-command-line
follow symbolic links listed on the command line
--dereference-command-line-symlink-to-dir
follow each command line symbolic link
that points to a directory
--hide=PATTERN do not list implied entries matching shell PATTERN
(overridden by -a or -A)
--hyperlink[=WHEN] hyperlink file names; WHEN can be 'always'
(default if omitted), 'auto', or 'never'
--indicator-style=WORD append indicator with style WORD to entry names:
none (default), slash (-p),
file-type (--file-type), classify (-F)
-i, --inode print the index number of each file
-I, --ignore=PATTERN do not list implied entries matching shell PATTERN
-k, --kibibytes default to 1024-byte blocks for disk usage
-l use a long listing format
-L, --dereference when showing file information for a symbolic
link, show information for the file the link
references rather than for the link itself
-m fill width with a comma separated list of entries
-n, --numeric-uid-gid like -l, but list numeric user and group IDs
-N, --literal print entry names without quoting
-o like -l, but do not list group information
-p, --indicator-style=slash
append / indicator to directories
-q, --hide-control-chars print ? instead of nongraphic characters
--show-control-chars show nongraphic characters as-is (the default,
unless program is 'ls' and output is a terminal)
-Q, --quote-name enclose entry names in double quotes
--quoting-style=WORD use quoting style WORD for entry names:
literal, locale, shell, shell-always,
shell-escape, shell-escape-always, c, escape
-r, --reverse reverse order while sorting
-R, --recursive list subdirectories recursively
-s, --size print the allocated size of each file, in blocks
-S sort by file size, largest first
--sort=WORD sort by WORD instead of name: none (-U), size (-S),
time (-t), version (-v), extension (-X)
--time=WORD with -l, show time as WORD instead of default
modification time: atime or access or use (-u);
ctime or status (-c); also use specified time
as sort key if --sort=time (newest first)
--time-style=STYLE with -l, show times using style STYLE:
full-iso, long-iso, iso, locale, or +FORMAT;
FORMAT is interpreted like in 'date'; if FORMAT
is FORMAT1<newline>FORMAT2, then FORMAT1 applies
to non-recent files and FORMAT2 to recent files;
if STYLE is prefixed with 'posix-', STYLE
takes effect only outside the POSIX locale
-t sort by modification time, newest first
-T, --tabsize=COLS assume tab stops at each COLS instead of 8
-u with -lt: sort by, and show, access time;
with -l: show access time and sort by name;
otherwise: sort by access time, newest first
-U do not sort; list entries in directory order
-v natural sort of (version) numbers within text
-w, --width=COLS set output width to COLS. 0 means no limit
-x list entries by lines instead of by columns
-X sort alphabetically by entry extension
-Z, --context print any security context of each file
-1 list one file per line. Avoid '\n' with -q or -b
--help 이 도움말을 표시하고 끝냅니다
--version 버전 정보를 출력하고 끝냅니다
방법2. man 도움말
ubuntu@server:~$ man ls
명령어 옵션을 사용하는 방법
-영문자 또는 --단어 ⇒ -영문자 방식은 여러개의 옵션을 조합해서 사용할 때
ubuntu@server:~$ ls -a
. .profile examples.desktop
.. .ssh test
.ICEauthority .sudo_as_admin_successful 공개
.Xauthority .vboxclient-clipboard.pid 다운로드
.bash_history .vboxclient-display-svga-x11.pid 문서
.bash_logout .vboxclient-draganddrop.pid 바탕화면
.bashrc .vboxclient-seamless.pid 비디오
.cache .xsession-errors 사진
.config 2nd.txt 음악
.gnupg 3rd.txt 템플릿
.local 4th.txt
.mozilla abc.txt
ubuntu@server:~$ ls --all
. .profile examples.desktop
.. .ssh test
.ICEauthority .sudo_as_admin_successful 공개
.Xauthority .vboxclient-clipboard.pid 다운로드
.bash_history .vboxclient-display-svga-x11.pid 문서
.bash_logout .vboxclient-draganddrop.pid 바탕화면
.bashrc .vboxclient-seamless.pid 비디오
.cache .xsession-errors 사진
.config 2nd.txt 음악
.gnupg 3rd.txt 템플릿
.local 4th.txt
.mozilla abc.txt
-영문자영문자 형식으로 조합된 경우 ⇒ -영문자 -영문자 옵션의 결합
ubuntu@server:~$ ls -al ⇐ -a 옵션과 -l 옵션을 결합 ⇒ ls -a -l 과 동일
합계 124
drwxr-xr-x 16 ubuntu ubuntu 4096 9월 7 11:51 .
drwxr-xr-x 3 root root 4096 9월 4 10:04 ..
-rw------- 1 ubuntu ubuntu 1908 9월 7 11:39 .ICEauthority
-rw------- 1 ubuntu ubuntu 0 9월 7 11:39 .Xauthority
-rw------- 1 ubuntu ubuntu 927 9월 7 11:49 .bash_history
-rw-r--r-- 1 ubuntu ubuntu 220 9월 4 10:04 .bash_logout
-rw-r--r-- 1 ubuntu ubuntu 3771 9월 4 10:04 .bashrc
drwx------ 13 ubuntu ubuntu 4096 9월 7 08:34 .cache
drwx------ 13 ubuntu ubuntu 4096 9월 7 11:47 .config
drwx------ 3 ubuntu ubuntu 4096 9월 7 11:37 .gnupg
drwx------ 3 ubuntu ubuntu 4096 9월 4 13:28 .local
drwx------ 5 ubuntu ubuntu 4096 9월 4 15:39 .mozilla
-rw-r--r-- 1 ubuntu ubuntu 807 9월 4 10:04 .profile
drwx------ 2 ubuntu ubuntu 4096 9월 7 08:36 .ssh
-rw-r--r-- 1 ubuntu ubuntu 0 9월 4 15:10 .sudo_as_admin_successful
-rw-r----- 1 ubuntu ubuntu 5 9월 7 11:39 .vboxclient-clipboard.pid
-rw-r----- 1 ubuntu ubuntu 5 9월 7 11:39 .vboxclient-display-svga-x11.pid
-rw-r----- 1 ubuntu ubuntu 5 9월 7 11:39 .vboxclient-draganddrop.pid
-rw-r----- 1 ubuntu ubuntu 5 9월 7 11:39 .vboxclient-seamless.pid
-rw------- 1 ubuntu ubuntu 4269 9월 7 11:36 .xsession-errors
-rw-r--r-- 1 ubuntu ubuntu 0 9월 4 13:33 2nd.txt
-rw-r--r-- 1 ubuntu ubuntu 0 9월 4 13:58 3rd.txt
-rw-r--r-- 1 ubuntu ubuntu 0 9월 4 13:58 4th.txt
-rw-r--r-- 1 ubuntu ubuntu 0 9월 4 13:29 abc.txt
-rw-r--r-- 1 ubuntu ubuntu 8980 9월 4 10:04 examples.desktop
-rw-r--r-- 1 ubuntu ubuntu 64 9월 7 11:48 test
drwxr-xr-x 2 ubuntu ubuntu 4096 9월 4 13:28 공개
drwxr-xr-x 2 ubuntu ubuntu 4096 9월 4 13:28 다운로드
drwxr-xr-x 2 ubuntu ubuntu 4096 9월 4 13:28 문서
drwxr-xr-x 2 ubuntu ubuntu 4096 9월 4 13:28 바탕화면
drwxr-xr-x 2 ubuntu ubuntu 4096 9월 4 13:28 비디오
drwxr-xr-x 2 ubuntu ubuntu 4096 9월 4 13:28 사진
drwxr-xr-x 2 ubuntu ubuntu 4096 9월 4 13:28 음악
drwxr-xr-x 2 ubuntu ubuntu 4096 9월 4 13:28 템플릿
Ubuntu Server에서 CD-ROM을 마운트
C:\Program Files\Oracle\VirtualBox\VBoxGuestAdditions.iso
#1 root 계정으로 로그인
ubuntu@server-b:~$ sudo su ⇐ root 계정으로 로그인
[sudo] password for ubuntu: ubuntu
root@server-b:/home/ubuntu# cd ⇐ cd 명령어는 디렉터리를 변경. 인자가 없는 경우에는 사용자의 홈 디렉터로 이동
root@server-b:~# ⇐ root 사용자의 홈 디렉터리로 이동
root@server-b:~# pwd ⇐ 현재 디렉터리를 표시
/root
#2 CD-ROM을 마운트할 디렉터리를 생성
root@server-b:~# ls /mnt/cdrom
ls: cannot access '/mnt/cdrom': No such file or directory
root@server-b:~# mkdir -p /mnt/cdrom ⇐ mkdir : 디렉터리를 생성
-p : 디렉터리를 순차적으로 생성
root@server-b:~# ls /mnt/cdrom
#3 마운트
root@server-b:~# mount /dev/cdrom /mnt/cdrom ⇐ /dev/cdrom 디바이스를 /mnt/cdrom 디렉터리에 연결
mount: /mnt/cdrom: WARNING: device write-protected, mounted read-only.
root@server-b:~# cd /mnt/cdrom ⇐ 마운트된 디렉터리로 접근해서 디바이스를 이용
root@server-b:/mnt/cdrom# ls
AUTORUN.INF runasroot.sh VBoxSolarisAdditions.pkg
autorun.sh TRANS.TBL VBoxWindowsAdditions-amd64.exe
cert VBoxDarwinAdditions.pkg VBoxWindowsAdditions.exe
NT3x VBoxDarwinAdditionsUninstall.tool VBoxWindowsAdditions-x86.exe
OS2 VBoxLinuxAdditions.run
root@server-b:/mnt/cdrom# ./VBoxLinuxAdditions.run --nox11 ⇐ VirtualBox 확장 프로그램 실행
Verifying archive integrity... All good.
Uncompressing VirtualBox 6.1.12 Guest Additions for Linux........
VirtualBox Guest Additions installer
Removing installed version 6.1.12 of VirtualBox Guest Additions...
Copying additional installer modules ...
Installing additional modules ...
VirtualBox Guest Additions: Starting.
VirtualBox Guest Additions: Building the VirtualBox Guest Additions kernel
modules. This may take a while.
VirtualBox Guest Additions: To build modules for other installed kernels, run
VirtualBox Guest Additions: /sbin/rcvboxadd quicksetup <version>
VirtualBox Guest Additions: or
VirtualBox Guest Additions: /sbin/rcvboxadd quicksetup all
VirtualBox Guest Additions: Building the modules for kernel 4.15.0-115-generic.
This system is currently not set up to build kernel modules.
Please install the gcc make perl packages from your distribution.
VirtualBox Guest Additions: Running kernel modules will not be replaced until
the system is restarted
root@server-b:/mnt/cdrom#
root@server-b:/mnt/cdrom# mount
sysfs on /sys type sysfs (rw,nosuid,nodev,noexec,relatime)
:
/var/lib/snapd/snaps/core_8268.snap on /snap/core/8268 type squashfs (ro,nodev,relatime,x-gdu.hide)
lxcfs on /var/lib/lxcfs type fuse.lxcfs (rw,nosuid,nodev,relatime,user_id=0,group_id=0,allow_other)
tmpfs on /run/user/1000 type tmpfs (rw,nosuid,nodev,relatime,size=204096k,mode=700,uid=1000,gid=1000)
/dev/sr0 on /mnt/cdrom type iso9660 (ro,relatime,nojoliet,check=s,map=n,blocksize=2048)
root@server-b:/mnt/cdrom#
#4 언마운트
root@server-b:/mnt/cdrom# umount /mnt/cdrom
umount: /mnt/cdrom: target is busy. ⇐ 마운트 디렉터리(/mnt/cdrom)에서 umount 하려고 했기 때문에 발생
root@server-b:/mnt/cdrom# umount --help
Usage:
umount [-hV]
umount -a [options]
umount [options] <source> | <directory>
Unmount filesystems.
Options:
-a, --all unmount all filesystems
-A, --all-targets unmount all mountpoints for the given device in the
current namespace
-c, --no-canonicalize don't canonicalize paths
-d, --detach-loop if mounted loop device, also free this loop device
--fake dry run; skip the umount(2) syscall
-f, --force force unmount (in case of an unreachable NFS system)
-i, --internal-only don't call the umount.<type> helpers
-n, --no-mtab don't write to /etc/mtab
-l, --lazy detach the filesystem now, clean up things later
-O, --test-opts <list> limit the set of filesystems (use with -a)
-R, --recursive recursively unmount a target with all its children
-r, --read-only in case unmounting fails, try to remount read-only
-t, --types <list> limit the set of filesystem types
-v, --verbose say what is being done
-h, --help display this help
-V, --version display version
For more details see umount(8).
root@server-b:/mnt/cdrom# umount -l /mnt/cdrom
root@server-b:/mnt/cdrom# mount ⇐ cdrom이 사라진 것을 확인
sysfs on /sys type sysfs (rw,nosuid,nodev,noexec,relatime)
:
lxcfs on /var/lib/lxcfs type fuse.lxcfs (rw,nosuid,nodev,relatime,user_id=0,group_id=0,allow_other)
tmpfs on /run/user/1000 type tmpfs (rw,nosuid,nodev,relatime,size=204096k,mode=700,uid=1000,gid=1000)
root@server-b:/mnt/cdrom#
가상 머신의 특정 디렉터리를 ISO 파일로 제작 (P135)
#1 genisoimage 프로그램 설치 여부를 확인
root@server-b:/# dpkg --get-selections genisoimage
dpkg: no packages found matching genisoimage
#2 genisoimage 설치
root@server-b:/# apt install genisoimage
#3 /bin 디렉터리 아래에 있는 파일과 디렉터리를 boot.iso 파일로 압축
root@server-b:/# genisoimage -r -J -o boot.iso /boot
I: -input-charset not specified, using utf-8 (detected in locale settings)
Using MENU000.LST;1 for /boot/grub/menu.lst (menu.lst~)
Using GCRY_000.MOD;1 for /boot/grub/i386-pc/gcry_sha512.mod (gcry_sha1.mod)
Using PASSW000.MOD;1 for /boot/grub/i386-pc/password_pbkdf2.mod (password.mod)
Using MDRAI000.MOD;1 for /boot/grub/i386-pc/mdraid09_be.mod (mdraid09.mod)
Using SEARC000.MOD;1 for /boot/grub/i386-pc/search_fs_file.mod (search_fs_uuid.mod)
Using GFXTE000.MOD;1 for /boot/grub/i386-pc/gfxterm_menu.mod (gfxterm_background.mod)
Using GCRY_001.MOD;1 for /boot/grub/i386-pc/gcry_sha1.mod (gcry_sha256.mod)
Using USBSE000.MOD;1 for /boot/grub/i386-pc/usbserial_usbdebug.mod (usbserial_ftdi.mod)
Using VIDEO000.MOD;1 for /boot/grub/i386-pc/videotest.mod (videotest_checksum.mod)
Using USBSE001.MOD;1 for /boot/grub/i386-pc/usbserial_ftdi.mod (usbserial_pl2303.mod)
Using USBSE002.MOD;1 for /boot/grub/i386-pc/usbserial_pl2303.mod (usbserial_common.mod)
Using PART_000.MOD;1 for /boot/grub/i386-pc/part_sunpc.mod (part_sun.mod)
Using XNU_U000.MOD;1 for /boot/grub/i386-pc/xnu_uuid.mod (xnu_uuid_test.mod)
Using MULTI000.MOD;1 for /boot/grub/i386-pc/multiboot2.mod (multiboot.mod)
13.12% done, estimate finish Mon Sep 7 05:34:28 2020
26.25% done, estimate finish Mon Sep 7 05:34:28 2020
39.33% done, estimate finish Mon Sep 7 05:34:28 2020
52.46% done, estimate finish Mon Sep 7 05:34:28 2020
65.55% done, estimate finish Mon Sep 7 05:34:28 2020
78.67% done, estimate finish Mon Sep 7 05:34:28 2020
91.76% done, estimate finish Mon Sep 7 05:34:28 2020
Total translation table size: 0
Total rockridge attributes bytes: 25187
Total directory bytes: 45056
Path table size(bytes): 66
Max brk space used 44000
38143 extents written (74 MB)
#4 ISO 파일을 마운트
#4-1 마운트 디렉터리 생성
root@server-b:/# mkdir -p /mnt/iso
#4-2 mount
root@server-b:/# mount -o loop boot.iso /mnt/iso
mount: /mnt/iso: WARNING: device write-protected, mounted read-only.
#5 /bin 디렉터리와 /mnt/iso 디렉터리를 비교
root@server-b:/# ls -l /mnt/iso
total 68985
-r--r--r-- 1 root root 217469 Aug 26 13:45 config-4.15.0-115-generic
dr-xr-xr-x 5 root root 2048 Sep 6 23:49 grub
-r--r--r-- 1 root root 57957373 Sep 6 23:52 initrd.img-4.15.0-115-generic
-r--r--r-- 1 root root 4074919 Aug 26 13:45 System.map-4.15.0-115-generic
-r--r--r-- 1 root root 8388256 Aug 26 13:48 vmlinuz-4.15.0-115-generic
root@server-b:/# ls -l /boot
total 68992
-rw-r--r-- 1 root root 217469 Aug 26 13:45 config-4.15.0-115-generic
drwxr-xr-x 5 root root 4096 Sep 6 23:49 grub
-rw-r--r-- 1 root root 57957373 Sep 6 23:52 initrd.img-4.15.0-115-generic
-rw------- 1 root root 4074919 Aug 26 13:45 System.map-4.15.0-115-generic
-rw------- 1 root root 8388256 Aug 26 13:48 vmlinuz-4.15.0-115-generic
#6 umount
root@server-b:/# umount /mnt/iso
기본 명령어
root@server-b:/# cd ⇐ root 사용자의 홈 디렉터리로 이동
root@server-b:~# ls ⇐ 서브 디렉터리와 파일을 보여 달라
root@server-b:~# ls -a ⇐ 숨김 파일을 포함해서 출력
. .. .bash_history .bashrc .lesshst .profile .ssh ⇐ 마침표로 시작하면 → 숨김 파일 및 디렉터리
Quiz. 명령어의 실행 결과가 나머지와 다른 것은?
-
root@server:/bin# ls
-
root@server:/bin# ls . ⇐ . 또는 .. 으로 시작하는 경로 ⇒ 상대 경로
-
root@server:/bin# ls ./
-
root@server:/bin# ls / ⇐ / 로 시작하는 경로 ⇒ 절대 경로
-
root@server:/bin# ls /bin
-
root@server:/bin# ls /bin/*
-
root@server:/bin# ls /bin/
Quiz. root 사용자의 홈 디렉터로 이동하는 방법이 아닌 것은? (답 없음)
-
root@server:/bin/test# cd
-
root@server:/bin/test# cd ~
-
root@server:/bin/test# cd $HOME
-
root@server:/bin/test# cd /root
Quiz. 다음 명령어의 실행 결과는?
root@server:/tmp# touch aaa ⇐ /tmp/aaa 파일 생성
root@server:/tmp# touch bbb ⇐ /tmp/bbb 파일 생성
root@server:/tmp# touch ccc ⇐ /tmp/ccc 파일 생성
root@server:/tmp# mkdir ddd ⇐ /tmp/ddd/ 디렉터리 생성
root@server:/tmp# ls ⇐ /tmp 아래의 파일과 디렉터리를 출력 → aaa bbb ccc ddd
root@server:/tmp# mv aaa bbb ccc ddd ⇐ mv 이전할대상들 이전할위치(디렉터리)
root@server:/tmp# ls ⇐ ddd 디렉터리만 출력
root@server:/tmp# ls ./ddd ⇐ /tmp/ddd 디렉터리 아래의 파일과 디렉터리를 출력 → aaa bbb ccc
Quiz. 다음 명령어의 실행 결과는?
root@server:/tmp# touch aaa
root@server:/tmp# touch bbb
root@server:/tmp# touch ccc
root@server:/tmp# mkdir ddd
root@server:/tmp# mkdir eee
root@server:/tmp# ls
root@server:/tmp# mv aaa bbb ccc ddd eee
root@server:/tmp# ls
root@server:/tmp# ls ./ddd ⇐ mv 명령어로 /tmp/eee 디렉터리 아래오 이동했기 때문에
No such file or dirctory 오류가 발생
root@server:/tmp# ls ./eee → aaa bbb ccc ddd ⇐ 3개의 파일과 1개의 디렉터리를 확인
네트워크 정보 확인
root@server-b:~# ifconfig ⇐ IP 정보를 확인
enp0s3: flags=4163<UP,BROADCAST,RUNNING,MULTICAST> mtu 1500
inet 10.0.2.5 netmask 255.255.255.0 broadcast 10.0.2.255 ⇐ IP 주소와 서브넷 마스크를 확인
inet6 fe80::a00:27ff:fed9:ce01 prefixlen 64 scopeid 0x20<link>
ether 08:00:27:d9:ce:01 txqueuelen 1000 (Ethernet)
RX packets 50435 bytes 70241350 (70.2 MB)
RX errors 0 dropped 0 overruns 0 frame 0
TX packets 8091 bytes 741383 (741.3 KB)
TX errors 0 dropped 0 overruns 0 carrier 0 collisions 0
lo: flags=73<UP,LOOPBACK,RUNNING> mtu 65536
inet 127.0.0.1 netmask 255.0.0.0
inet6 ::1 prefixlen 128 scopeid 0x10<host>
loop txqueuelen 1000 (Local Loopback)
RX packets 100 bytes 12950 (12.9 KB)
RX errors 0 dropped 0 overruns 0 frame 0
TX packets 100 bytes 12950 (12.9 KB)
TX errors 0 dropped 0 overruns 0 carrier 0 collisions 0
root@server-b:~# ifconfig enp0s3
enp0s3: flags=4163<UP,BROADCAST,RUNNING,MULTICAST> mtu 1500
inet 10.0.2.5 netmask 255.255.255.0 broadcast 10.0.2.255
inet6 fe80::a00:27ff:fed9:ce01 prefixlen 64 scopeid 0x20<link>
ether 08:00:27:d9:ce:01 txqueuelen 1000 (Ethernet)
RX packets 50487 bytes 70245070 (70.2 MB)
RX errors 0 dropped 0 overruns 0 frame 0
TX packets 8143 bytes 747079 (747.0 KB)
TX errors 0 dropped 0 overruns 0 carrier 0 collisions 0
root@server-b:~# ip route ⇐ 게이트웨이 주소를 확인
default via 10.0.2.1 dev enp0s3 proto dhcp src 10.0.2.5 metric 100
10.0.2.0/24 dev enp0s3 proto kernel scope link src 10.0.2.5
10.0.2.1 dev enp0s3 proto dhcp scope link src 10.0.2.5 metric 100
root@server-b:~# systemd-resolve --status enp0s3 ⇐ DNS 정보를 확인
Link 2 (enp0s3)
Current Scopes: DNS
LLMNR setting: yes
MulticastDNS setting: no
DNSSEC setting: no
DNSSEC supported: no
DNS Servers: 168.126.63.1
168.126.63.2
고정 IP 주소로 변경 (P153 참고)
Ubuntu Desktop에서 고정 IP 설정
root@server:~# nm-connection-editor
IPv4 설정
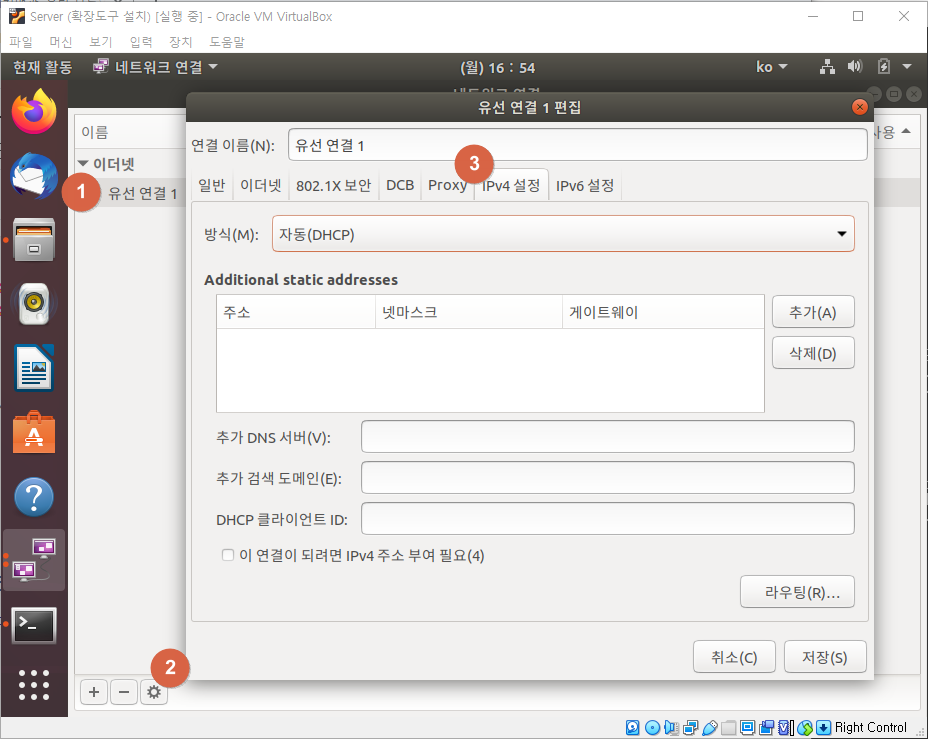

-
방식: 수동 ⇒ DHCP를 사용하지 않음
-
주소: 10.0.2.100 ⇒ VirtualBox의 NatNetwork에서 부여할 수 있는 IP 범위내의 값을 사용
-
넷마스크: 255.255.255.0
-
게이트웨이: 10.0.2.1
-
DNS 서버: 8.8.8.8 ⇒ 구글에서 제공하는 DNS 서버 주소
root@server:~# reboot
ubuntu@server:~$ ip a
1: lo: <LOOPBACK,UP,LOWER_UP> mtu 65536 qdisc noqueue state UNKNOWN group default qlen 1000
link/loopback 00:00:00:00:00:00 brd 00:00:00:00:00:00
inet 127.0.0.1/8 scope host lo
valid_lft forever preferred_lft forever
inet6 ::1/128 scope host
valid_lft forever preferred_lft forever
2: enp0s3: <BROADCAST,MULTICAST,UP,LOWER_UP> mtu 1500 qdisc fq_codel state UP group default qlen 1000
link/ether 08:00:27:96:b2:75 brd ff:ff:ff:ff:ff:ff
inet 10.0.2.100/24 brd 10.0.2.255 scope global noprefixroute enp0s3
valid_lft forever preferred_lft forever
inet6 fe80::2e79:698a:dba3:9968/64 scope link noprefixroute
valid_lft forever preferred_lft forever
Ubuntu Server에서 고정 IP를 설정
ubuntu@server-b:~$ sudo su
[sudo] password for ubuntu: ubuntu
root@server-b:/home/ubuntu# cd
root@server-b:~# ls /etc/netplan/ ⇐ 네트워크 설정 파일을 확인
50-cloud-init.yaml
root@server-b:~# cp /etc/netplan/50-cloud-init.yaml /etc/netplan/50-cloud-init.yaml.bak ⇐ 백업 파일 생성
root@server-b:~# vi /etc/netplan/50-cloud-init.yaml ⇐ 네트워크 설정 파일을 편집
|
network: ethernets: enp0s3: dhcp4: false addresses: [10.0.2.200/24] gateway4: 10.0.2.1 nameservers: addresses: [8.8.8.8] version: 2 |
* 주의할 점
탭(tab)을 사용하면 안 됨 (반드시 공백을 사용)
같은 레벨의 정보는 동일 컬럼에 맞춰서 작성
root@server-b:~# netplan apply

각각 접속 확인
Ubuntu Desktop에서 Ubuntu Server로 접속 ⇒ ssh 10.0.2.200
Ubuntu Server에서 Ubuntu Desktop으로 접속 ⇒ ssh 10.0.2.100
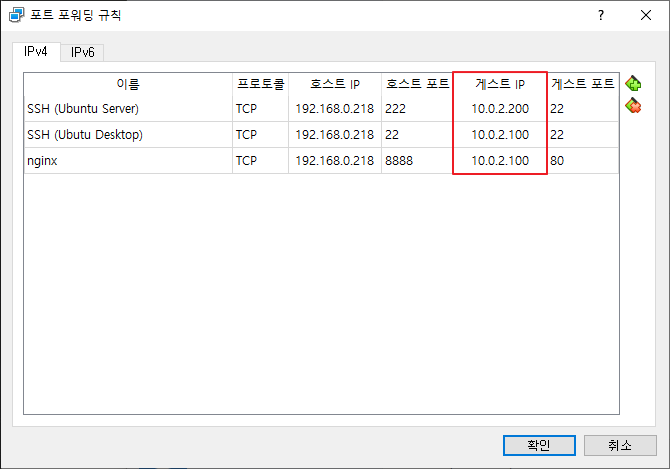
호스트 PC에서 Ubuntu Server로 접속 ⇒ C:\Users\myanj> ssh ubuntu@192.168.0.218 -p 22
호스트 PC에서 Ubuntu Desktop으로 접속 ⇒ C:\Users\myanj> ssh ubuntu@192.168.0.218 -p 222
파이프, 필터, 리다이렉트 연습을 꼭 해 보세요.
'리눅스(Linux)' 카테고리의 다른 글
| 우분투 네트워크간 접속, 포트포워딩 (0) | 2020.10.07 |
|---|---|
| [리눅스] 사용자 및 그룹관리 & 파일 소유권 & 프로세스 & 패키지 관리 & 쉘스크립트 (0) | 2020.09.08 |
| 꿀팁 정보 (0) | 2020.09.06 |
| 9/3 (목) 실습 환경 구성 (0) | 2020.09.06 |
| [리눅스] 가상화 & Virtual machine & Ubuntu & 네트워크 (0) | 2020.09.05 |