[DevOps] Docker & Docker Compose & Jenkins(Ansible/Serverspec실행, PipeLine, Parameter)
이미지를 만드는 이유
개발환경을 컨테이너를 기반으로 하여 관리하면 얼마나 더 쉽게 운용할 수 있는지를 보고있음
관리자계정
admin / admin
젠킨스
작업을 기술
작업을 기술하는 방법은 다양
- 정의된 쉘명령어들을 순차적으로 실행
- 작업을 등록 후 build now를 누르면 순차적으로 실행
- 결과를 보여줌
- 들어가서 실행된 결과물을 콘솔에서 확인 가능
- 통합적으로 build된 기록들을 보는것이 가능
https://hub.docker.com/ 에 회원 가입해 주세요.
C:\HashiCorp\WorkDir> vagrant snapshot save V2 ⇐ V2 이름으로 스냅샷 생성
도커 참조 ⇒ http://pyrasis.com/docker.html
Docker 설치
[vagrant@demo html]$ sudo su
[root@demo html]# cd
[root@demo ~]# yum install -y docker
Docker 서비스 기동
[root@demo ~]# systemctl start docker.service
[root@demo ~]# docker version
Client:
Version: 1.13.1
API version: 1.26
Package version: docker-1.13.1-162.git64e9980.el7.centos.x86_64
Go version: go1.10.3
Git commit: 64e9980/1.13.1
Built: Wed Jul 1 14:56:42 2020
OS/Arch: linux/amd64
Server:
Version: 1.13.1
API version: 1.26 (minimum version 1.12)
Package version: docker-1.13.1-162.git64e9980.el7.centos.x86_64
Go version: go1.10.3
Git commit: 64e9980/1.13.1
Built: Wed Jul 1 14:56:42 2020
OS/Arch: linux/amd64
Experimental: false
Docker Hub 로그인
[root@demo ~]# docker login
Login with your Docker ID to push and pull images from Docker Hub. If you don't have a Docker ID, head over to https://hub.docker.com to create one.
Username: DOCKER_HUB_ID
Password: DOCKER_HUB_PASSWORD
Login Succeeded
Docker 이미지 검색
[root@demo ~]# docker search centos
INDEX NAME DESCRIPTION STARS OFFICIAL AUTOMATED
docker.io docker.io/centos The official build of CentOS. 6187 [OK]
docker.io docker.io/ansible/centos7-ansible Ansible on Centos7 132 [OK]
docker.io docker.io/consol/centos-xfce-vnc Centos container with "headless" VNC sessi... 119 [OK]
docker.io docker.io/jdeathe/centos-ssh OpenSSH / Supervisor / EPEL/IUS/SCL Repos ... 115 [OK]
docker.io docker.io/centos/systemd systemd enabled base container. 86 [OK]
docker.io docker.io/centos/mysql-57-centos7 MySQL 5.7 SQL database server 83
docker.io docker.io/imagine10255/centos6-lnmp-php56 centos6-lnmp-php56 58 [OK]
docker.io docker.io/tutum/centos Simple CentOS docker image with SSH access 47
docker.io docker.io/centos/postgresql-96-centos7 PostgreSQL is an advanced Object-Relationa... 46
docker.io docker.io/kinogmt/centos-ssh CentOS with SSH 29 [OK]
docker.io docker.io/pivotaldata/centos-gpdb-dev CentOS image for GPDB development. Tag nam... 12
docker.io docker.io/guyton/centos6 From official centos6 container with full ... 10 [OK]
docker.io docker.io/centos/tools Docker image that has systems administrati... 6 [OK]
docker.io docker.io/drecom/centos-ruby centos ruby 6 [OK]
docker.io docker.io/pivotaldata/centos Base centos, freshened up a little with a ... 5
docker.io docker.io/darksheer/centos Base Centos Image -- Updated hourly 3 [OK]
docker.io docker.io/mamohr/centos-java Oracle Java 8 Docker image based on Centos 7 3 [OK]
docker.io docker.io/pivotaldata/centos-gcc-toolchain CentOS with a toolchain, but unaffiliated ... 3
docker.io docker.io/pivotaldata/centos-mingw Using the mingw toolchain to cross-compile... 3
docker.io docker.io/blacklabelops/centos CentOS Base Image! Built and Updates Daily! 1 [OK]
docker.io docker.io/indigo/centos-maven Vanilla CentOS 7 with Oracle Java Developm... 1 [OK]
docker.io docker.io/mcnaughton/centos-base centos base image 1 [OK]
docker.io docker.io/pivotaldata/centos6.8-dev CentosOS 6.8 image for GPDB development 0
docker.io docker.io/pivotaldata/centos7-dev CentosOS 7 image for GPDB development 0
docker.io docker.io/smartentry/centos centos with smartentry 0 [OK]
이미지 획득 및 확인
[root@demo ~]# docker pull docker.io/centos
Using default tag: latest
Trying to pull repository docker.io/library/centos ...
latest: Pulling from docker.io/library/centos
3c72a8ed6814: Pull complete Digest: sha256:76d24f3ba3317fa945743bb3746fbaf3a0b752f10b10376960de01da70685fbd
Status: Downloaded newer image for docker.io/centos:latest
[root@demo ~]# docker image ls
REPOSITORY TAG IMAGE ID CREATED SIZE
docker.io/centos latest 0d120b6ccaa8 4 weeks ago 215 MB
태그를 지정해서 이미지 획득
[root@demo ~]# docker pull docker.io/centos:centos7
Trying to pull repository docker.io/library/centos ...
centos7: Pulling from docker.io/library/centos
75f829a71a1c: Pull complete Digest: sha256:19a79828ca2e505eaee0ff38c2f3fd9901f4826737295157cc5212b7a372cd2b
Status: Downloaded newer image for docker.io/centos:centos7
[root@demo ~]# docker image ls
REPOSITORY TAG IMAGE ID CREATED SIZE
docker.io/centos centos7 7e6257c9f8d8 4 weeks ago 203 MB
docker.io/centos latest 0d120b6ccaa8 4 weeks ago 215 MB
컨테이너 실행 및 확인
[root@demo ~]# docker run -t -d --name centos7 docker.io/centos:centos7
61260c982277f41fc52a6331f55f853422d601d0e995e85ac9ff892eed69fc3d
[root@demo ~]# docker container ls ⇐ 동일 docker container ps
CONTAINER ID IMAGE COMMAND CREATED STATUS PORTS NAMES
61260c982277 docker.io/centos:centos7 "/bin/bash" 10 seconds ago Up 9 seconds centos7
컨테이너 내부에 명령어 실행
[root@demo ~]# docker exec centos7 cat /etc/redhat-release ⇐ 컨테이너 내부에 설치되어 있는 CentOS 버전을 확인
CentOS Linux release 7.8.2003 (Core)
[root@demo ~]# docker exec -it centos7 /bin/bash
[root@61260c982277 /]# cat /etc/redhat-release ⇐ 실행 중인 컨테이너 내부로 진입
CentOS Linux release 7.8.2003 (Core)
[root@61260c982277 /]# exit
exit
[root@demo ~]#
우분투 이미지를 이용해 컨테이너를 실행
[root@demo ~]# docker run --name ubuntu -td docker.io/ubuntu
Unable to find image 'docker.io/ubuntu:latest' locally
Trying to pull repository docker.io/library/ubuntu ...
latest: Pulling from docker.io/library/ubuntu ⇐ 로컬 레포지터리에 이미지가 존재하지 않기 때문에
54ee1f796a1e: Pull complete 먼지 이미지를 가져와서 실행
f7bfea53ad12: Pull complete
46d371e02073: Pull complete
b66c17bbf772: Pull complete
Digest: sha256:31dfb10d52ce76c5ca0aa19d10b3e6424b830729e32a89a7c6eee2cda2be67a5
Status: Downloaded newer image for docker.io/ubuntu:latest
[root@demo ~]# docker exec -it ubuntu /bin/bash
root@dcfde3761f4f:/# ls
bin dev home lib32 libx32 mnt proc run srv tmp var
boot etc lib lib64 media opt root sbin sys usr
root@dcfde3761f4f:/# cat /etc/issue
Ubuntu 20.04.1 LTS \n \l
root@dcfde3761f4f:/# exit
exit
컨테이너 정지/재기동
[root@demo ~]# docker container stop centos7
centos7 ~~~~~ 컨테이너 이름 또는 ID
[root@demo ~]# docker container ls
CONTAINER ID IMAGE COMMAND CREATED STATUS PORTS NAMES
dcfde3761f4f docker.io/ubuntu "/bin/bash" 19 minutes ago Up 19 minutes ubuntu
[root@demo ~]# docker container ls -a ⇐ 정지 상태의 컨테이너를 포함해서 조회
CONTAINER ID IMAGE COMMAND CREATED STATUS PORTS NAMES
dcfde3761f4f docker.io/ubuntu "/bin/bash" 19 minutes ago Up 19 minutes ubuntu
61260c982277 docker.io/centos:centos7 "/bin/bash" 35 minutes ago Exited (137) 16 seconds ago centos7
[root@demo ~]# docker container start centos7
centos7
[root@demo ~]# docker container ls
CONTAINER ID IMAGE COMMAND CREATED STATUS PORTS NAMES
dcfde3761f4f docker.io/ubuntu "/bin/bash" 22 minutes ago Up 22 minutes ubuntu
61260c982277 docker.io/centos:centos7 "/bin/bash" 37 minutes ago Up 4 seconds centos7
컨테이너 삭제
[root@demo ~]# docker container rm -f centos7
centos7
[root@demo ~]# docker container ls -a
CONTAINER ID IMAGE COMMAND CREATED STATUS PORTS NAMES
dcfde3761f4f docker.io/ubuntu "/bin/bash" 23 minutes ago Up 23 minutes ubuntu
[root@demo ~]# docker image ls
REPOSITORY TAG IMAGE ID CREATED SIZE
docker.io/ubuntu latest 4e2eef94cd6b 3 weeks ago 73.9 MB
docker.io/centos centos7 7e6257c9f8d8 4 weeks ago 203 MB
docker.io/centos latest 0d120b6ccaa8 4 weeks ago 215 MB
nginx 컨테이너 기동
[root@demo ~]# docker pull nginx ⇐ 공식 배포 이미지는 docker.io를 생략 가능
Using default tag: latest
Trying to pull repository docker.io/library/nginx ...
latest: Pulling from docker.io/library/nginx
d121f8d1c412: Pull complete
ebd81fc8c071: Pull complete
655316c160af: Pull complete
d15953c0e0f8: Pull complete
2ee525c5c3cc: Pull complete
Digest: sha256:9a1f8ed9e2273e8b3bbcd2e200024adac624c2e5c9b1d420988809f5c0c41a5e
Status: Downloaded newer image for docker.io/nginx:latest
[root@demo ~]# docker container run -d -p 8000:80 --name nginx-latest nginx
~~~~~~
호스트의 8000번 포트를 컨테이너 내부의 80번 포트를 연결
a5dc2917fe72dd0a82b37eae85f9047447f450b550aa0677ba5bff34d185c376 ⇐ 컨테이너 ID
[root@demo ~]# docker container ls
CONTAINER ID IMAGE COMMAND CREATED STATUS PORTS NAMES
a5dc2917fe72 nginx "/docker-entrypoin..." About a minute ago Up About a minute 0.0.0.0:8000->80/tcp nginx-latest
dcfde3761f4f docker.io/ubuntu "/bin/bash" 33 minutes ago Up 33 minutes ubuntu
[root@demo ~]# curl http://localhost:8000
~~~~~ ~~~ ⇒ nginx 컨테이너의 80번 포트로 맵핑
Vagrant로 생성한 CentOS
<!DOCTYPE html> ⇐ nginx 컨테이너 내부의 nginx 웹 루트 디렉터리에 있는 index.html 파일의 내용이 보이고 있음
<html>
<head>
<title>Welcome to nginx!</title>
<style>
body {
width: 35em;
margin: 0 auto;
font-family: Tahoma, Verdana, Arial, sans-serif;
}
</style>
</head>
<body>
<h1>Welcome to nginx!</h1>
<p>If you see this page, the nginx web server is successfully installed and
working. Further configuration is required.</p>
<p>For online documentation and support please refer to
Commercial support is available at
<p><em>Thank you for using nginx.</em></p>
</body>
</html>
내 PC에서 http://192.168.33.10:8000 했을 때 nginx 컨테이너 내부에 있는 index.html 파일을 제공
~~~~~~~~~~~~~
Vagrant로 생성한 CentOS의 주소

컨테이너 표준 출력 로그 확인
[root@demo ~]# docker container logs -f nginx-latest
/docker-entrypoint.sh: /docker-entrypoint.d/ is not empty, will attempt to perform configuration
/docker-entrypoint.sh: Looking for shell scripts in /docker-entrypoint.d/
/docker-entrypoint.sh: Launching /docker-entrypoint.d/10-listen-on-ipv6-by-default.sh
10-listen-on-ipv6-by-default.sh: Getting the checksum of /etc/nginx/conf.d/default.conf
10-listen-on-ipv6-by-default.sh: Enabled listen on IPv6 in /etc/nginx/conf.d/default.conf
/docker-entrypoint.sh: Launching /docker-entrypoint.d/20-envsubst-on-templates.sh
/docker-entrypoint.sh: Configuration complete; ready for start up
172.17.0.1 - - [11/Sep/2020:01:38:31 +0000] "GET / HTTP/1.1" 200 612 "-" "curl/7.29.0" "-"
192.168.33.1 - - [11/Sep/2020:01:43:36 +0000] "GET / HTTP/1.1" 200 612 "-" "Mozilla/5.0 (Windows NT 10.0; Win64; x64) AppleWebKit/537.36 (KHTML, like Gecko) Chrome/85.0.4183.83 Safari/537.36" "-"
192.168.33.1 - - [11/Sep/2020:01:43:36 +0000] "GET /favicon.ico HTTP/1.1" 404 555 "http://192.168.33.10:8000/" "Mozilla/5.0 (Windows NT 10.0; Win64; x64) AppleWebKit/537.36 (KHTML, like Gecko) Chrome/85.0.4183.83 Safari/537.36" "-"
2020/09/11 01:43:36 [error] 28#28: *2 open() "/usr/share/nginx/html/favicon.ico" failed (2: No such file or directory), client: 192.168.33.1, server: localhost, request: "GET /favicon.ico HTTP/1.1", host: "192.168.33.10:8000", referrer: "http://192.168.33.10:8000/"
Dockerfile 확인
CentOS Dockerfile
FROM scratch ⇐ 컨테이너 이미지를 처음부터 생성
ADD centos-7-x86_64-docker.tar.xz / ⇐ 이미지에 파일을 추가 (ADD: 압축 파일을 풀어서 배치, COPY: 단순 복사)
LABEL \
org.label-schema.schema-version="1.0" \
org.label-schema.name="CentOS Base Image" \
org.label-schema.vendor="CentOS" \
org.label-schema.license="GPLv2" \
org.label-schema.build-date="20200809" \
org.opencontainers.image.title="CentOS Base Image" \
org.opencontainers.image.vendor="CentOS" \
org.opencontainers.image.licenses="GPL-2.0-only" \
org.opencontainers.image.created="2020-08-09 00:00:00+01:00"
CMD ["/bin/bash"] ⇐ 컨테이너가 기동될 때 실행할 default 프로세스를 지정
Nginx Dockerfile
FROM debian:buster-slim ⇐ 베이스 이미지를 지정
:
COPY docker-entrypoint.sh / ⇐ 이미지를 생성할 호스트의 파일을 컨테이너 이미지 내부로 복사
COPY 10-listen-on-ipv6-by-default.sh /docker-entrypoint.d
COPY 20-envsubst-on-templates.sh /docker-entrypoint.d
ENTRYPOINT ["/docker-entrypoint.sh"] ⇐
EXPOSE 80 ⇐ 호스트와 연결할 포트 번호를 설정
STOPSIGNAL SIGTERM
CMD ["nginx", "-g", "daemon off;"]
Dockerfile을 이용해서 이미지를 생성 (P166)
#1 컨테이너 이미지 내부로 전달할 파일을 생성
[root@demo ~]# echo "Hello, Docker." > hello-docker.txt
#2 Dockerfile을 생성 ⇒ 이미지 생성에 사용
[root@demo ~]# vi Dockerfile
|
FROM docker.io/centos:latest ⇐ 베이스 이미지를 지정 ADD hello-docker.txt /tmp ⇐ 호스트에 있는 hello-docker.txt 파일을 컨테이너 이미지의 /tmp 아래로 복사 # RUN yum install -y epel-release ⇐ 컨테이너 이미지를 만들 때 실행 CMD [ "/bin/bash" ] ⇐ 컨테이너가 실행될 때 실행할 명령어 |
#3 Dockerfile을 이용해서 이미지를 생성 (이미지를 만드는 첫번째 방법)
[root@demo ~]# docker image build -t myanjini/centos:1.0 .
~~~~~~~~~~~~~ ~~~~~~~~~~~~~ ~
| | Dockerfile 위치 ( . ⇒ 현재 위치)
| +-- 이미지 이름 ⇒ DOCKER_HUB_ID/IMAGE_NAME:TAG_NAME
+-- Dockerfile을 이용해서 이미지를 생성
Sending build context to Docker daemon 20.39 MB
Step 1/4 : FROM docker.io/centos:latest
---> 0d120b6ccaa8
Step 2/4 : ADD hello-docker.txt /tmp
---> 5149a93e97ad
Removing intermediate container 462722e8db78
Step 3/4 : RUN yum install -y epel-release
---> Running in ac8e0e7a5385
CentOS-8 - AppStream 4.4 MB/s | 5.8 MB 00:01
CentOS-8 - Base 661 kB/s | 2.2 MB 00:03
CentOS-8 - Extras 13 kB/s | 7.9 kB 00:00
Dependencies resolved.
================================================================================
Package Architecture Version Repository Size
================================================================================
Installing:
epel-release noarch 8-8.el8 extras 23 k
Transaction Summary
================================================================================
Install 1 Package
Total download size: 23 k
Installed size: 32 k
Downloading Packages:
epel-release-8-8.el8.noarch.rpm 922 kB/s | 23 kB 00:00
--------------------------------------------------------------------------------
Total 28 kB/s | 23 kB 00:00
warning: /var/cache/dnf/extras-cbfb2f07b0021b7e/packages/epel-release-8-8.el8.noarch.rpm: Header V3 RSA/SHA256 Signature, key ID 8483c65d: NOKEY
CentOS-8 - Extras 1.6 MB/s | 1.6 kB 00:00
Importing GPG key 0x8483C65D:
Userid : "CentOS (CentOS Official Signing Key) <security@centos.org>"
Fingerprint: 99DB 70FA E1D7 CE22 7FB6 4882 05B5 55B3 8483 C65D
From : /etc/pki/rpm-gpg/RPM-GPG-KEY-centosofficial
Key imported successfully
Running transaction check
Transaction check succeeded.
Running transaction test
Transaction test succeeded.
Running transaction
Preparing : 1/1
Installing : epel-release-8-8.el8.noarch 1/1
Running scriptlet: epel-release-8-8.el8.noarch 1/1
Verifying : epel-release-8-8.el8.noarch 1/1
Installed:
epel-release-8-8.el8.noarch
Complete!
---> b0b2f80c7c6b
Removing intermediate container ac8e0e7a5385
Step 4/4 : CMD /bin/bash
---> Running in d7825c5b3472
---> 96bac9420c73
Removing intermediate container d7825c5b3472
Successfully built 96bac9420c73 ⇐ 이미지 ID
[root@demo ~]# docker image ls
REPOSITORY TAG IMAGE ID CREATED SIZE
myanjini/centos 1.0 96bac9420c73 2 minutes ago 246 MB
docker.io/nginx latest 7e4d58f0e5f3 14 hours ago 133 MB
docker.io/ubuntu latest 4e2eef94cd6b 3 weeks ago 73.9 MB
docker.io/centos centos7 7e6257c9f8d8 4 weeks ago 203 MB
docker.io/centos latest 0d120b6ccaa8 4 weeks ago 215 MB
#4 생성한 이미지를 이용해서 컨테이너를 실행
[root@demo ~]# docker container run -td --name devops-book-1.0 myanjini/centos:1.0
aa9eab5ad4c14a20cfa0605dd599ec65c5eefce5f5de2705f3b52495a51ffb68 ⇐ 컨테이너 ID
[root@demo ~]# docker container ls
CONTAINER ID IMAGE COMMAND CREATED STATUS PORTS NAMES
aa9eab5ad4c1 myanjini/centos:1.0 "/bin/bash" 33 seconds ago Up 32 seconds devops-book-1.0
a5dc2917fe72 nginx "/docker-entrypoin..." About an hour ago Up About an hour 0.0.0.0:8000->80/tcp nginx-latest
dcfde3761f4f docker.io/ubuntu "/bin/bash" About an hour ago Up About an hour ubuntu
#5 컨테이너 내부로 진입
[root@demo ~]# docker exec -it devops-book-1.0 /bin/bash
[root@aa9eab5ad4c1 /]# cat /tmp/hello-docker.txt ⇐ 이미지 생성 중 파일 복사되었는지 확인
Hello, Docker.
[root@aa9eab5ad4c1 /]# rpm -qa | grep epel ⇐ epel 패키지 설치 여부를 확인
epel-release-8-8.el8.noarch
#6 컨테이너 내용을 변경 후 변경된 내용을 이미지로 생성 (이미지를 만드는 두번째 방법)
[root@aa9eab5ad4c1 /]# yum install -y epel-release ⇐ Dockerfile에서 설치하지 않은 경우
[root@aa9eab5ad4c1 /]# yum install -y nginx ⇐ 컨테이너 내부에 nginx를 설치
[root@aa9eab5ad4c1 /]# exit
[root@demo ~]# docker container commit devops-book-1.0 myanjini/centos:1.1
~~~~~~~~~~~~~~~~~ ~~~~~~~~~~ ~~~~~~~~~~~~~
| 컨테이너 이름 이미지 이름
+-- 컨테이너의 현재 상태를 이미지로 기록(생성)
sha256:e1857e6ba97a2a3c725c4a12dfd758dcf40cc5e0b46be09410a49ece2ee4d580
[root@demo ~]# docker image ls
REPOSITORY TAG IMAGE ID CREATED SIZE
myanjini/centos 1.1 e1857e6ba97a About a minute ago 334 MB
myanjini/centos 1.0 96bac9420c73 16 minutes ago 246 MB
docker.io/nginx latest 7e4d58f0e5f3 14 hours ago 133 MB
docker.io/ubuntu latest 4e2eef94cd6b 3 weeks ago 73.9 MB
docker.io/centos centos7 7e6257c9f8d8 4 weeks ago 203 MB
docker.io/centos latest 0d120b6ccaa8 4 weeks ago 215 MB
#7 도커 허브에 이미지를 등록
[root@demo ~]# docker image push myanjini/centos:1.1
The push refers to a repository [docker.io/myanjini/centos]
ff69ce0b06cd: Pushed
99b77b4ffe98: Pushed
a30523500c33: Pushed
291f6e44771a: Layer already exists
1.1: digest: sha256:57cd7748e60154ccb15f7d3625797e5eb87b4cb32967dbe4a5b814500b6f12e3 size: 1160
yum install 오류가 발생하는 경우
HOST(Vagrant로 설치한 CentOS)에서 systemctl start firewalld 명령으로 방화벽을 실행한 후 컨테이너 내부에서 yum install 하면 됩니다.
denied: requested access to the resource is denied 오류가 발생하는 경우
1. docker login 하지 않은 경우
2. 도커 이미지의 사용자 명이 도커 허브와 다른 경우, docker tag 명령으로 이름을 변경한 후 등록
docker tag 원본이미지명 변경이미지명
#8 도커 허브에 로그인 후 등록된 이미지를 확인

#9 도커 허브에 등록된 이미지를 이용해서 컨테이너를 실행
[root@demo ~]# docker run --name myanjini_centos -dt -p 8888:80 myanjini/centos:1.1
e4b89daf7979830e3ea2069281ecc256ec0b8d535342c151967fb2df60b80566
[root@demo ~]# docker container ls
CONTAINER ID IMAGE COMMAND CREATED STATUS PORTS NAMES
e4b89daf7979 myanjini/centos:1.1 "/bin/bash" 11 seconds ago Up 10 seconds 0.0.0.0:8888->80/tcp myanjini_centos
aa9eab5ad4c1 myanjini/centos:1.0 "/bin/bash" About an hour ago Up About an hour devops-book-1.0
a5dc2917fe72 nginx "/docker-entrypoin..." 2 hours ago Up 2 hours 0.0.0.0:8000->80/tcp nginx-latest
dcfde3761f4f docker.io/ubuntu "/bin/bash" 3 hours ago Up 3 hours ubuntu
#10 모든 컨테이너를 삭제
[root@demo ~]# docker container rm -f $(docker container ls -a -q)
Docker Compose (P170)
#1 Docker Composer 설치
[root@demo ~]# curl -L https://github.com/docker/compose/releases/download/1.8.0/docker-compose-`uname -s`-`uname -m` > /usr/bin/docker-compose
% Total % Received % Xferd Average Speed Time Time Time Current
Dload Upload Total Spent Left Speed
100 651 100 651 0 0 1641 0 --:--:-- --:--:-- --:--:-- 1643
100 7783k 100 7783k 0 0 2236k 0 0:00:03 0:00:03 --:--:-- 2721k
[root@demo ~]# chmod +x /usr/bin/docker-compose
[root@demo ~]# docker-compose --version
docker-compose version 1.8.0, build f3628c7
#2 docker-compose.yml 파일을 생성
[root@demo ~]# vi docker-compose.yml
|
db: image: docker.io/mysql ⇒ 컨테이너 이미지 ports: - "3306:3306" ⇒ 호스트 포트 : 컨테이너 내부 포트(서비스 포트) environment: ⇒ 컨테이너 내부의 환경 변수 - MYSQL_ROOT_PASSWORD=password app: image: docker.io/tomcat ports: - "9090:8080" web: image: docker.io/nginx ports: - "9000:80" |
#3 컨테이너 생성 및 확인
[root@demo ~]# docker-compose up -d
Pulling app (docker.io/tomcat:latest)...
Trying to pull repository docker.io/library/tomcat ...
latest: Pulling from docker.io/library/tomcat
d6ff36c9ec48: Pull complete c958d65b3090: Pull complete edaf0a6b092f: Pull complete 80931cf68816: Pull complete bf04b6bbed0c: Pull complete 8bf847804f9e: Pull complete 6bf89641a7f2: Pull complete 3e97fae54404: Pull complete 10dee6830d45: Pull complete 680b26b7a444: Pull complete Digest: sha256:7399db46a9f852b20437d1011eeac454e211935c5fd807f027fab6d89b594b5d
Status: Downloaded newer image for docker.io/tomcat:latest
Pulling db (docker.io/mysql:latest)...
Trying to pull repository docker.io/library/mysql ...
latest: Pulling from docker.io/library/mysql
d121f8d1c412: Already exists f3cebc0b4691: Pull complete 1862755a0b37: Pull complete 489b44f3dbb4: Pull complete 690874f836db: Pull complete baa8be383ffb: Pull complete 55356608b4ac: Pull complete dd35ceccb6eb: Pull complete 429b35712b19: Pull complete 162d8291095c: Pull complete 5e500ef7181b: Pull complete af7528e958b6: Pull complete Digest: sha256:e1bfe11693ed2052cb3b4e5fa356c65381129e87e38551c6cd6ec532ebe0e808
Status: Downloaded newer image for docker.io/mysql:latest
Creating root_db_1
Creating root_web_1
Creating root_app_1
[root@demo ~]# docker container ls
CONTAINER ID IMAGE COMMAND CREATED STATUS PORTS NAMES
b1f2d5faeebc docker.io/tomcat "catalina.sh run" 48 seconds ago Up 47 seconds 0.0.0.0:9090->8080/tcp root_app_1
3819a19dde57 docker.io/nginx "/docker-entrypoin..." 48 seconds ago Up 47 seconds 0.0.0.0:9000->80/tcp root_web_1
d14e24f2c505 docker.io/mysql "docker-entrypoint..." 48 seconds ago Up 47 seconds 0.0.0.0:3306->3306/tcp, 33060/tcp root_db_1
#4 컨테이너를 중지
[root@demo ~]# docker-compose down
Stopping root_app_1 ... done
Stopping root_web_1 ... done
Stopping root_db_1 ... done
Removing root_app_1 ... done
Removing root_web_1 ... done
Removing root_db_1 ... done
스냅샷 생성
C:\HashiCorp\WorkDir> vagrant snapshot save V3
Jenkins (P183)
Jenkins 설치 및 프로젝트 생성/실행
#1 JDK 설치
[root@demo ~]# yum -y install java-1.8.0-openjdk java-1.8.0-openjdk-devel
#2 Jenkins 설치
공식 설치 문서(CentOS 환경) ⇒ https://pkg.jenkins.io/redhat-stable/
[root@demo ~]# yum -y install http://mirrors.jenkins-ci.org/redhat-stable/jenkins-2.235.5-1.1.noarch.rpm
#3 Jenkins 기동
[root@demo ~]# systemctl start jenkins.service
#4 Jenkins 접속
호스트 PC에서 브라우저를 이용해서 http://192.168.33.10:8080/ 로 접속
접속에 필요한 패스워드를 확인(/var/lib/jenkins/secrets/initialAdminPassword) 후 접속
[root@demo ~]# cat /var/lib/jenkins/secrets/initialAdminPassword
19b503af1ea845e39b68f48627e1f85a ⇐ 패스워드는 호스트 마다 다릅니다.

접속되지 않는 경우 방화벽에 서비스 포트를 등록(허용)
# systemctl start firewalld
# firewall-cmd --zone=public --permanent --add-port=8080/tcp
# firewall-cmd --reload
#5 Jenkins 최초 설정
#5-1 Install suggested plugins 클릭
#5-2 설치를 진행
#5-3 관리자 계정 설정
#5-4 재시작


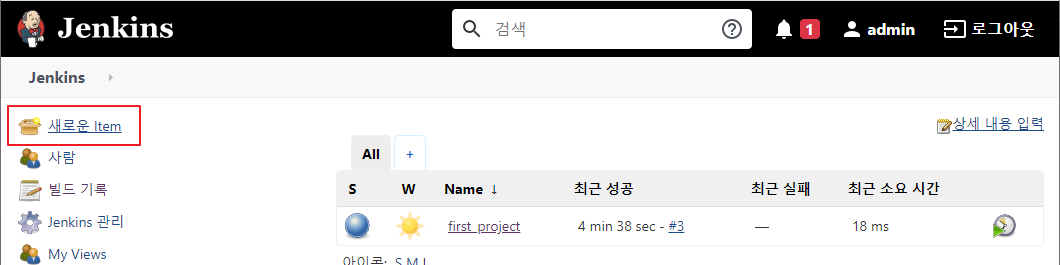
#6 프로젝트를 생성


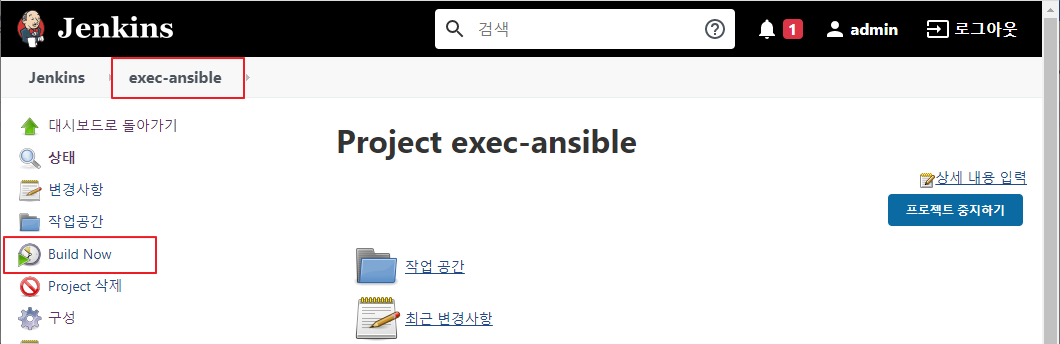
#7 프로젝트 실행 (build now)
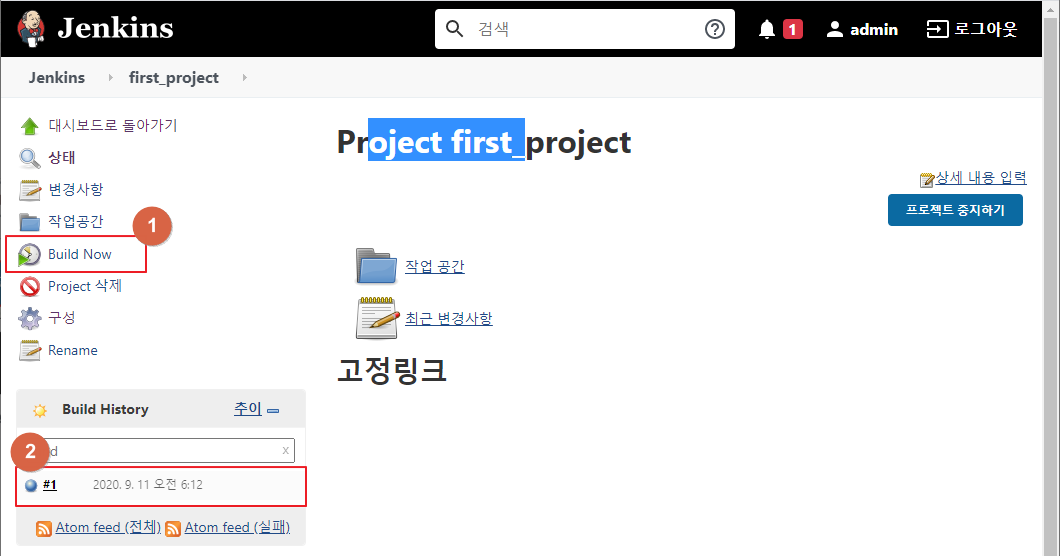
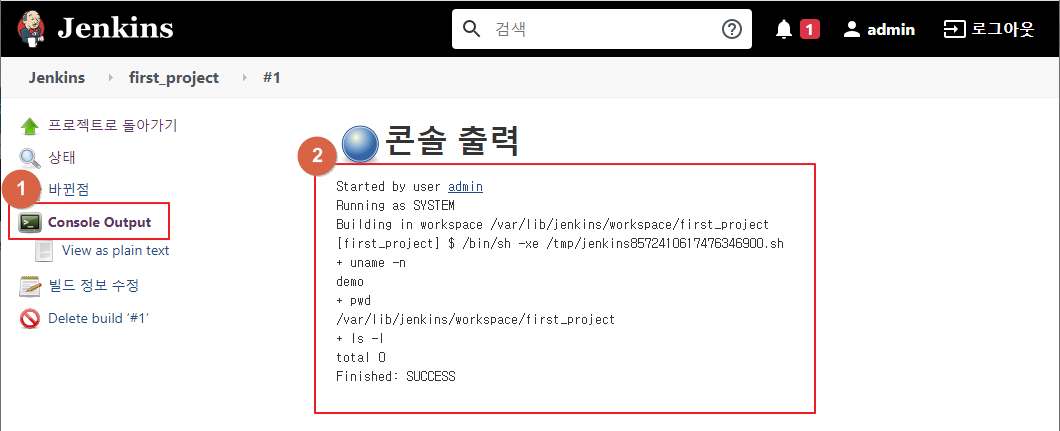
#8 실행 결과 확인
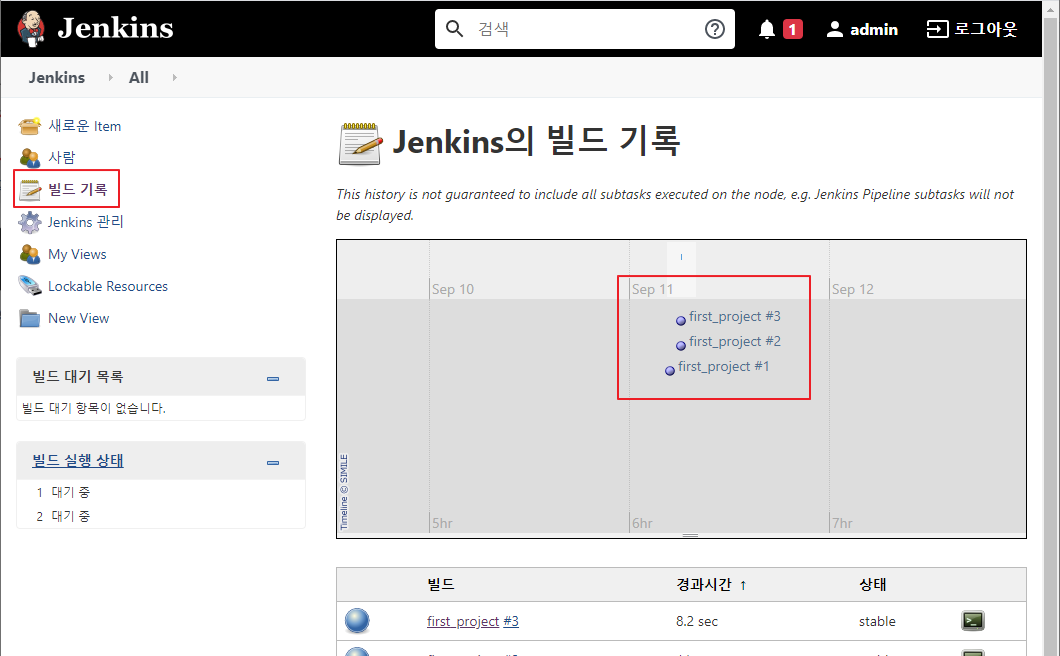
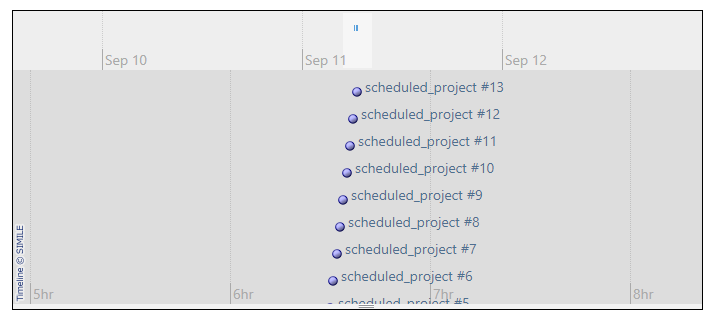
#9 프로젝트 결과 일람
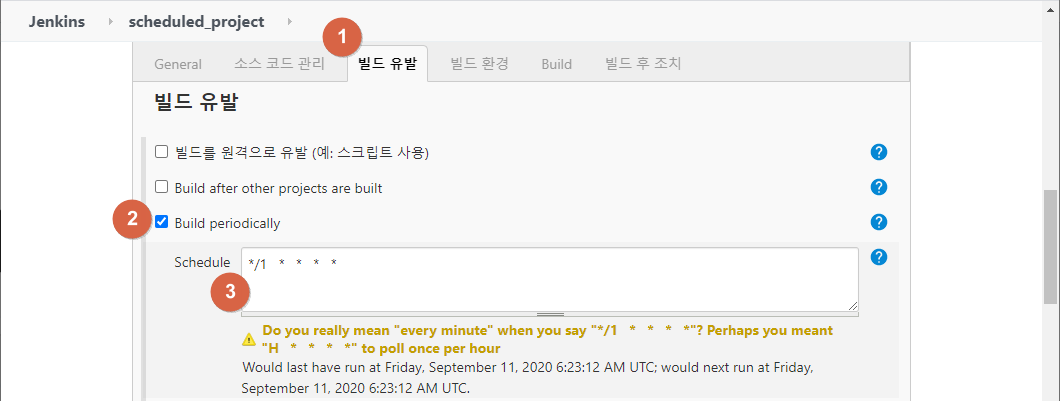
#10 정해진 시각에 실행되는 프로젝트를 생성


Jenkins에서 Ansible을 실행
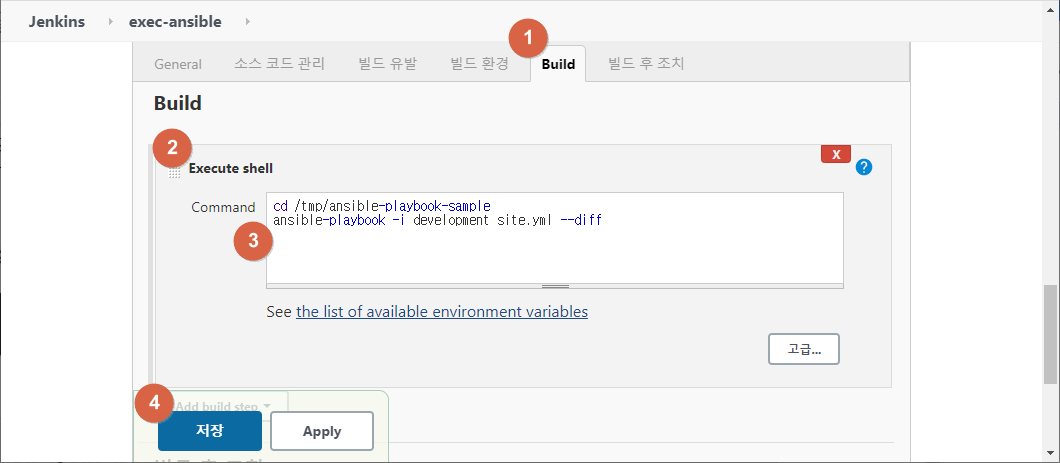
#1 샘플 코드 git clone
[root@demo ~]# exit
exit
[vagrant@demo ~]$ cd /tmp
[vagrant@demo tmp]$ git clone https://github.com/devops-book/ansible-playbook-sample.git
Cloning into 'ansible-playbook-sample'...
remote: Enumerating objects: 54, done.
remote: Total 54 (delta 0), reused 0 (delta 0), pack-reused 54
Unpacking objects: 100% (54/54), done.
#2 jenkins 사용자가 패스워드 없이 sudo 명령을 실행할 수 있도록 권한을 추가
[vagrant@demo tmp]$ sudo vi /etc/sudoers.d/jenkins
|
jenkins ALL=(ALL) NOPASSWD:ALL |
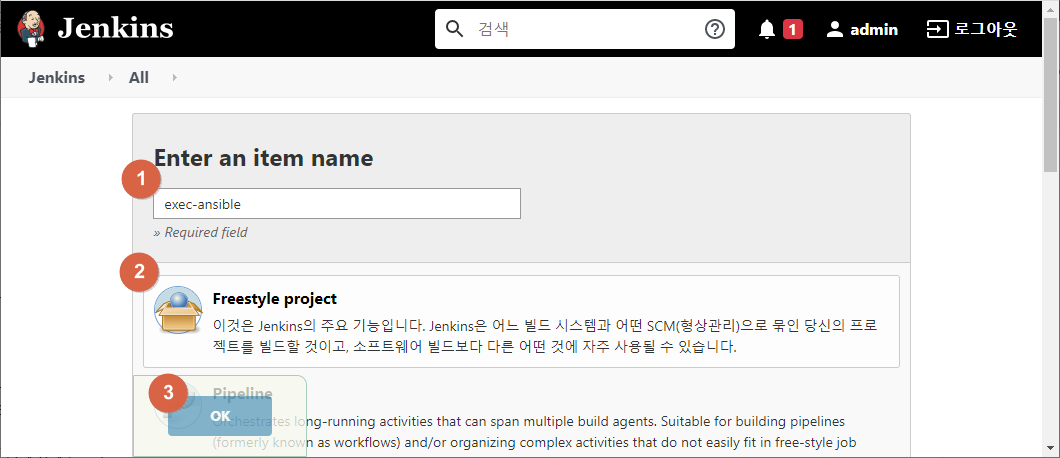
#3 exec-ansible 프로젝트 생성


Jenkins에서 Serverspec을 실행

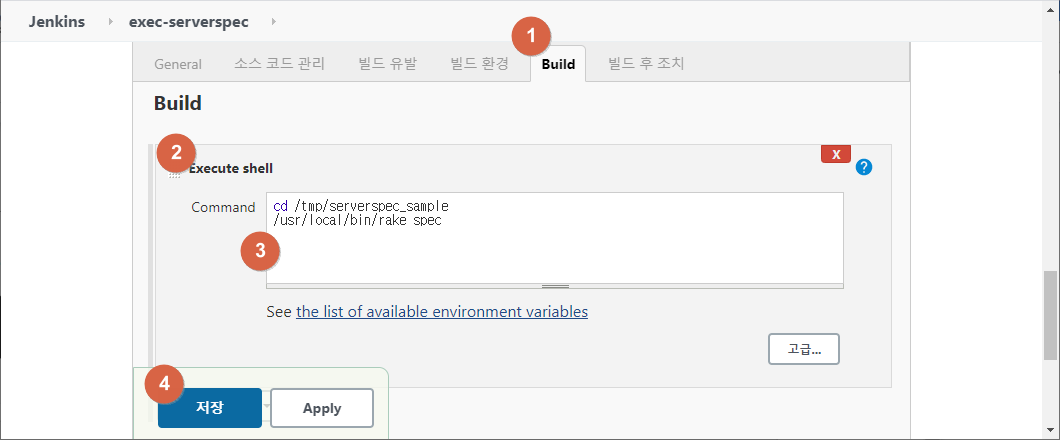
cd /tmp/serverspec_sample
/usr/local/rvm/rubies/ruby-2.7.0/bin/rake spec
~~~~~~~~~~~~~~~~~~~~~~~~~~~
which rake 명령으로 확인한 경로를 입력

콘솔에서 실패한 원인을 확인했더니, …
Serverspec 마지막 테스트 케이스(컨텐츠 내용 검증)를 통과하지 못 했기 때문
Serverspec 테스트 케이스를 통과할 수 있도록 ansible 템플릿을 수정
[vagrant@demo serverspec_sample]$ vi /tmp/ansible-playbook-sample/roles/nginx/templates/index.html.j2
|
Hello, {{ env }} ansible!! |
exec-ansible 프로젝트를 build now 해서 변경된 템플릿을 이용한 index.html 파일을 생성
exec-serverspec 프로젝트에서 build now 하면 성공하는 것을 확인

exec-ansible 프로젝트 실행 후 이어서 exec-serverspec 프로젝트가 실행되도록 수정

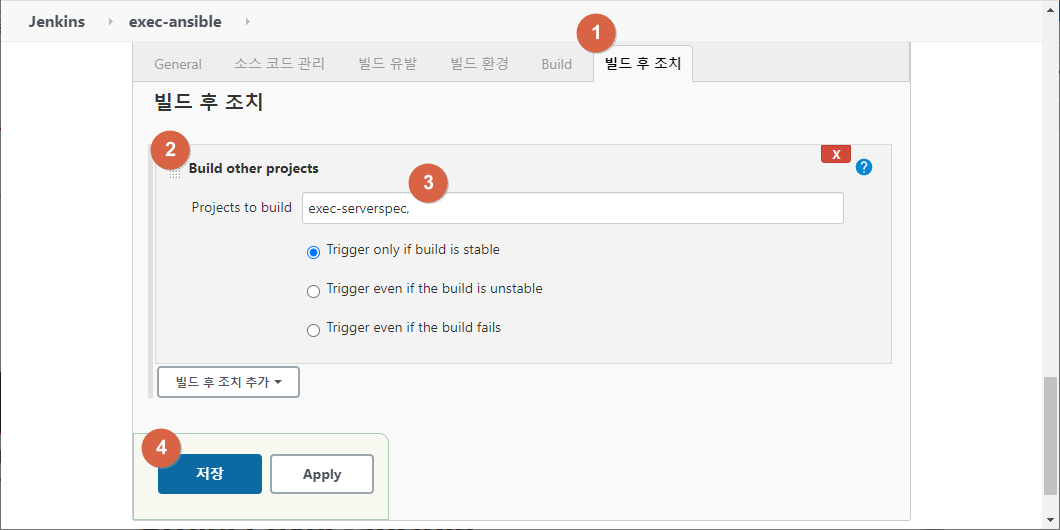

Pipeline으로 프로젝트 연결
#1 exec-ansible에서 후행 프로젝트로 exec-serverspec을 설정해 둔 것을 해제


#2 Pipeline 프로젝트 생성


node {
stage 'ansible'
build 'exec-ansible'
stage 'serverspec'
build 'exec-serverspec'
}

파라미터를 받아서 빌드하도록 수정
exec-ansible 프로젝트 수정


exec-ansible-serverspec 프로젝트 수정


node {
stage 'ansible'
build job: 'exec-ansible', parameters: [[$class: 'StringParameterValue', name: 'ENVIRONMENT', value: "${ENVIRONMENT}"]]
stage 'serverspec'
build 'exec-serverspec'
}

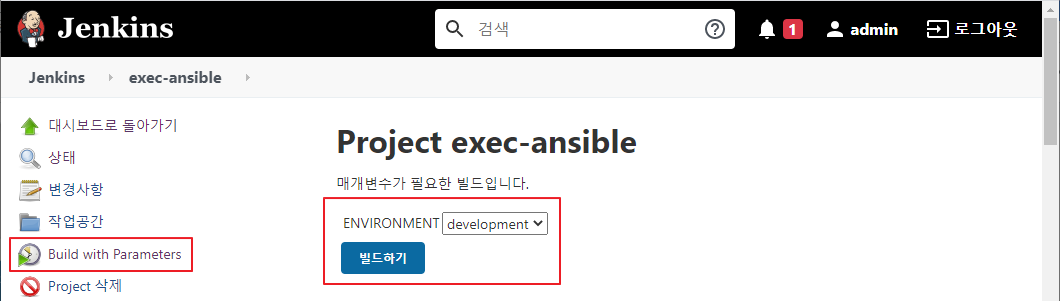
ENVIRONMENT : production 으로 선택 후 빌드하기를 클릭하면 빌드 실패

테스트에 사용된 테스트 케이스 파일을 확인
[vagrant@demo ~]$ cat /tmp/serverspec_sample/spec/localhost/web_spec.rb
require 'spec_helper'
describe package('nginx') do
it { should be_installed }
end
describe service('nginx') do
it { should be_enabled }
it { should be_running }
end
describe port(80) do
it { should be_listening }
end
describe file('/usr/share/nginx/html/index.html') do
it { should be_file }
it { should exist }
its(:content) { should match /^Hello, development ansible!!$/ }
end
테스트 케이스를 만들 때 사용하는 템플릿을 확인
[vagrant@demo ~]$ cat /tmp/ansible-playbook-sample/roles/serverspec_sample/templates/web_spec.rb.j2
require 'spec_helper'
describe package('nginx') do
it { should be_installed }
end
describe service('nginx') do
it { should be_enabled }
it { should be_running }
end
describe port(80) do
it { should be_listening }
end
describe file('/usr/share/nginx/html/index.html') do
it { should be_file }
it { should exist }
its(:content) { should match /^Hello, {{ env }} ansible!!$/ }
end
ansible 롤을 정의하고 있는 site.yml 파일을 확인
[vagrant@demo ~]$ cat /tmp/ansible-playbook-sample/site.yml
---
- hosts: webservers
become: yes
connection: local
roles:
- common
- nginx
# - serverspec ⇐ serverspec 설치
# - serverspec_sample ⇐ serverspec 에서 사용할 테스트 케이스를 만들어서 /tmp/serverspec_sample 디렉터리로 복사
# - jenkins
ENVIRONMENT 파라미터에 따라 테스트 케이스 파일이 생성되도록 하기 위해서는 site.yml 파일에 serverspec_sample 롤의 주석을 해제
exec-ansible-serverspec 프로젝트를 실행 (ENVIRONMENT로 production을 선택)

숙제
Jenkins의 exec-ansible-serverspec 프로젝트에서 ENVIRONMENT 파라미터를 production으로 설정 후 빌드한 결과 화면을 스크린 샷을 떠서 아래 주소에 등록
https://docs.google.com/spreadsheets/d/1yJQYo2yE5TBMHRM5CaJ_XvKryVVyk1Iaro1XXPx1LrU/edit?usp=sharing
주말에 복습을 해 보고, 월요일 아침에 Q&A을 갖도록 하겠습니다.