
1. 웹 설명
1. html(Hyper Text Markup Language)
2. DOM(Document Object Model)
- dom tree
- traversing, traverse(순회)
- manipulation(조작) : tree변경
3. 특정 문자열 가져오기
- 방법1 : 정규표현식
- 방법2 : HTML Parser라이브러리 (ex)BeautifulSoup4, lxml
2. 웹툰 회차별 이미지 다운로드
- 제목, 회차, url을 입력받는 함수 정의
#title(제목), 회차, url 을 입력 받아서 저장하는 함수 정의
import os
import requests
from bs4 import BeautifulSoup

def write_image(title,seq, url):

    #url = 'https://comic.naver.com/webtoon/detail.nhn?titleId=749279&no=4&weekday=mon'
    response = requests.get(url)
    #print(response.status_code)
    soup = BeautifulSoup(response.text, 'html.parser')

    image_urls = []
    for img in soup.select('img[src$=".jpg"]'):
        #print(img['src'])
        image_urls.append(img['src'])

    dir_name = 'img/'+title + '_' + seq
    if not os.path.isdir(dir_name):
        os.mkdir(dir_name)

    for image_url in image_urls:
        headers = {
            'Referer': url
        }
        #print(image_url)
        res = requests.get(image_url, headers=headers)
        #print(res.status_code)
        image_data = res.content
        file_name = os.path.basename(image_url)

        with open(dir_name+'/'+file_name,'wb') as f:
            print('image file name {} ({} bytes)'.format(file_name,len(image_data)))
            f.write(image_data)

#write_image('대만에서','1화','https://comic.naver.com/webtoon/detail.nhn?titleId=749279&no=4&weekday=mon')
- 네이버 웹툰 메인페이지 > 추천웹툰 에 있는 6가지 웹툰들의 제목과 링크를 가져오는 코드
#네이버 웹툰 메인 페이지에서 만화 제목과 링크를 추출해서 list에 저장한다
import os
import requests
from bs4 import BeautifulSoup
from urllib.parse import urljoin

url = 'https://comic.naver.com/index.nhn'

response = requests.get(url)
#print(response.status_code)
soup = BeautifulSoup(response.text, 'html.parser')

#a_tag_list = soup.select('#genreRecommand div.genreRecomInfo2 > h6 > a')
a_tag_list = soup.select('.genreRecomInfo2 h6 a')
#print(a_tag_list)

webtoon_list = []
for a_tag in a_tag_list:
    #if a_tag['href'] != '#none':
    #print(a_tag)
    link = urljoin(url,a_tag['href'])
    title = a_tag.text.strip()
    #print(title, link)
    webtoon_dict = {'title':title, 'link':link}
    webtoon_list.append(webtoon_dict)
    webtoon_dict = {}

print(len(webtoon_list))
print(webtoon_list)
- 코드를 출력해본 결과

- 메인페이지에서 뽑아낸 링크를 다시 한번 parsing을 통해 각 회차들의 링크, 제목, 몇화인지 뽑아낸다.
for webtoon_link in webtoon_list[0:2]:
link = webtoon_link['link']
response = requests.get(link)
#print(response.status_code)
soup = BeautifulSoup(response.text, 'html.parser')
title = webtoon_link['title']
a_tag_list = soup.select('td.title > a')
for a_tag in a_tag_list:
#print(a_tag)
link2 = urljoin(link, a_tag['href'])
# 회차제목
seq = a_tag.text
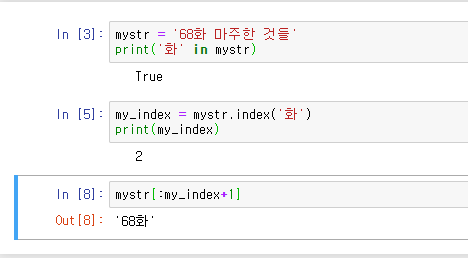
# 글제목에 '화' 라는 문자열이 있으면
if '화' in seq:
my_index = seq.index('화')
#print(my_index)
# '화' 문자열의 인덱스 기준으로 앞의 문자열을 슬라이싱 한다
seq = seq[:my_index+1]
print('------',title, seq)
write_image(title,seq,link2)
- 몇화인지 뽑아내기 위해 작성한 코드를 이해하기 위한 작업
- write_image(title, seq, link2)를 for문을 통해 실행함으로써 각 웹툰의 모든 화가 다운로드 되는 결과를 확인할 수 있다.
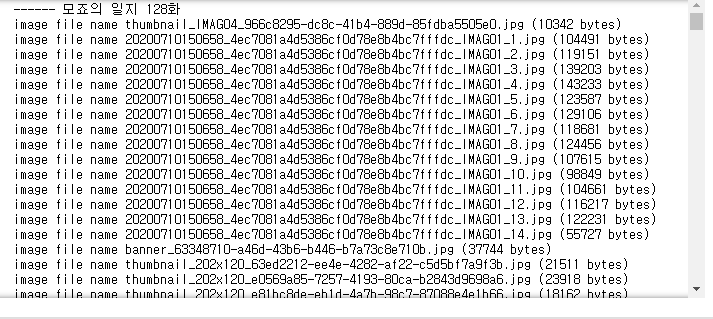
- 실제 img폴더 내에 각 웹툰의 각 화들의 이미지가 다운로드된 모습

3. BeautifulSoup_select_find함수사용
- html태그들을 통해 css selector를 연습
#Python’s Requests Library (Guide)
#https://realpython.com/python-requests/
book_html="""
<ul id="bible">
<li id="ge" class="first">
<ul class="second">
<div>
<li>
<span>aa</span>
</li>
</div>
<li>bb</li>
</ul>
</li>
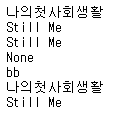
<li id="ex" class="first" >나의첫사회생활</li>
<li id="le" class="second">Still Me</li>
<li id="nu" class="second">화염과 분노 : 도널드 트럼프의 백악관 뒷이야기</li>
<li id="de">매일 좋을 수만은 없는 여행을 한다</li>
</ul>
"""
book_html
from bs4 import BeautifulSoup
soup = BeautifulSoup(book_html,'html.parser')
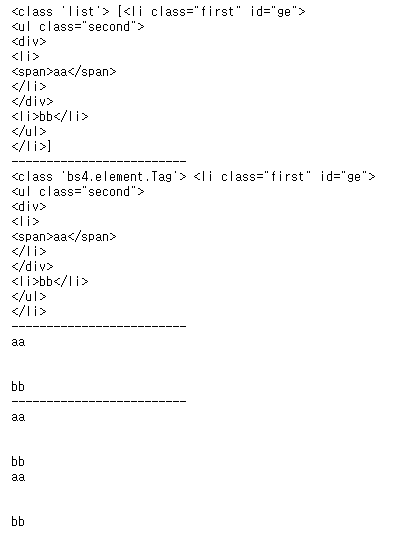
for li_tag in soup.select('ul li'):
print(li_tag)

- id로 찾기 & select(list 리턴) & select_one(하나만 리턴)
# id가 ge인 태그 가져오기
# select, select_one
print(type(soup.select('#ge')), soup.select('#ge'))
print('-------------------------')
print(type(soup.select_one('#ge')), soup.select_one('#ge'))
print('-------------------------')
#print(soup.select('#ge').text) #오류
print(soup.select_one('li#ge').text.strip()) #aa bb

print('-------------------------')
print(soup.select('#ge')[0].text.strip()) #aa bb
print(soup.select_one('#ge').text.strip()) #aa bb
- class로 찾기 & select(list 리턴) & select_one(하나만 리턴)
# class 명이 second인 태그
print(soup.select('.second'))
print('------------------------------')
print(soup.select('li.second'))
#[<li class="second" id="le">Still Me</li>, <li class="second" id="nu">화염과 분노 : 도널드 트럼프의 백악관 뒷이야기</li>]
print('------------------------------')
print(soup.select_one('li.second'))
#<li class="second" id="le">Still Me</li>

- find(), find_all()
# find()와 find_all()
# find() == select_one(), find_all() == select()
print(type(soup.find_all('li')), soup.find_all('li'))
print('----------------------------------------------')
print(type(soup.find('li')), soup.find('li'))

'''
결과
<class 'bs4.element.ResultSet'> [<li class="first" id="ge">
<ul class="second">
<div>
<li>
<span>aa</span>
</li>
</div>
<li>bb</li>
</ul>
</li>, <li>
<span>aa</span>
</li>, <li>bb</li>, <li class="first" id="ex">나의첫사회생활</li>, <li class="second" id="le">Still Me</li>, <li class="second" id="nu">화염과 분노 : 도널드 트럼프의 백악관 뒷이야기</li>, <li id="de">매일 좋을 수만은 없는 여행을 한다</li>]
----------------------------------------------
<class 'bs4.element.Tag'> <li class="first" id="ge">
<ul class="second">
<div>
<li>
<span>aa</span>
</li>
</div>
<li>bb</li>
</ul>
</li>
'''
# li.second
print(type(soup.find_all('li')), soup.find_all('li', attrs={"class":"second"}))
print('----------------------------------------')
print(type(soup.find_all('li')), soup.find('li', attrs={"class":"second"}))
print('----------------------------------------')
print(soup.find('li',attrs={"class":"second"}).string)
print(soup.find('li',attrs={"class":"second"}).text)
print(soup.select_one('li.second').text)

- lambda함수로 만들어 간단하게 test하기
# css선택자를 입력받아 결과를 반환한는 lambda함수 정의
sel = lambda ex : print(soup.select_one(ex).string)

sel('li#ex')
sel('ul li#le')
sel('ul > li#le')
sel('ul .second li')
sel('ul .second > li')
sel("li[id='ex']")
sel('li:nth-of-type(5)')
- " > " 를 붙히고 안붙히고의 차이
print(soup.select('ul.second li'))
print('----------------------------')
print(soup.select('ul.second > li'))

- li:nth-of-type(몇번째???) : li 태그 중에서 몇번째 li태그를 뽑을지 선택할 수 있음
print(len(soup.select('li')), soup.select('li'))
print('------------------')
print(soup.select('li:nth-of-type(5)'))

- 연습문제
html="""

<html>
<body>
<div id="main-goods" role="page">
<h1>과일과 야채</h1>

<ul id="fr-list">
<li class="red green" data-lo="ko">사과</li>
<li class="purple" data-lo="us">포도</li>
<li class="yellow" data-lo="us">레몬</li>
<li class="yellow" data-lo="ko">오렌지</li>
</ul>

<ul id="ve-list">
<li class="white green" data-lo="ko">무</li>
<li class="red green" data-lo="us">파프리카</li>
<li class="black" data-lo="ko">가지</li>
<li class="black" data-lo="us">아보카도</li>
<li class="white" data-lo="cn">연근</li>
</ul>
</div>
<body>
</html>
"""
# 1. 야채이름만 가져오기
# 2. 과일이름 가져오기
# 3. 야채 중에서 국산야채만'ko' 가져오기
# 4. 과일 중에서 미국과일만'us' 가져오기
# 5. 과일 중에서 노랑 yellow 가져오기
# 6. 야채 중에서 검정 black 가져오기
# 7. 전체 중에서 red green 가져오기
# 8. 8번째 li 가져오기
# 9. 전체에서 'us'가져오기
[수녕 풀이]
# 1. 야채이름만 가져오기 (리스트에 저장)
print(soup.select_one('#ve-list').text)
print('---------------------------------------')

# 2. 과일이름 가져오기
print(soup.select_one('#fr-list').text)
print('---------------------------------------')

# 3. 야채 중에서 국산야채만'ko' 가져오기
for i in soup.select("#ve-list li[data-lo='ko']"):
    print(i.text)
print('---------------------------------------')

# 4. 과일 중에서 미국과일만'us' 가져오기
for i in soup.select("#fr-list li[data-lo='us']"):
    print(i.text)
print('---------------------------------------')

# 5. 과일 중에서 노랑 yellow 가져오기
print(soup.select('#fr-list .yellow'))
print('---------------------------------------')

# 6. 야채 중에서 검정 black 가져오기
print(soup.select('#ve-list .black'))
print('---------------------------------------')

# 7. 전체 중에서 red green 가져오기!!!!!!!!!!!!!!!!!
print(soup.select('.red.green'))
print('---------------------------------------')

# 8. 8번째 li 가져오기
print(soup.select('#main-goods li:nth-of-type(8)'))
print('---------------------------------------')

# 9. 전체에서 'us'가져오기
print(soup.select('li[data-lo="us"]'))
4. 기상청 날씨 데이터 조회
- find(), find_all() 함수 사용
- 기상청에서 불러온 다음과 같은 html형태의 파일을 parsing하여 원하는 형태의 json형태로 저장해보자~!!
This XML file does not appear to have any style information associated with it. The document tree is shown below.
<rss version="2.0">
<channel>
<title>기상청 육상 중기예보</title>
<link>http://www.kma.go.kr/weather/forecast/mid-term_01.jsp</link>
<description>기상청 날씨 웹서비스</description>
<language>ko</language>
<generator>기상청</generator>
<pubDate>2020년 07월 22일 (수)요일 06:00</pubDate>
<item>
<author>기상청</author>
<category>육상중기예보</category>
<title>전국 육상 중기예보 - 2020년 07월 22일 (수)요일 06:00 발표</title>
<link>http://www.kma.go.kr/weather/forecast/mid-term_01.jsp</link>
<guid>http://www.kma.go.kr/weather/forecast/mid-term_01.jsp</guid>
<description>
<header>
<title>전국 육상중기예보</title>
<tm>202007220600</tm>
<wf>
<![CDATA[ ○ (강수) 25일(토)과 26일(일) 오전, 27일(월) 오후부터 30일(목)까지는 전국(30일 강원영동과 경남, 제주도 제외), 8월 1일(토)은 서울.경기도와 강원영서에 비가 오겠습니다.<br />○ (기온) 이번 예보기간의 낮 기온은 25~32도로 어제(28~32도)와 비슷하겠습니다.<br />○ (해상) 25일(토) 서해상과 남해상은 물결이 2.0~4.0m로 높게 일겠으니, 항해나 조업하는 선박은 유의하기 바랍니다.<br />○ (주말전망) 25일(토)은 대체로 흐리고 전국에 비가 오겠으며, 26일(일) 오전까지 비가 이어지겠습니다.<br /> 아침 기온은 20~22도, 낮 기온은 25~29도의 분포를 보이겠습니다.<br /><br />* 이번 예보기간의 강수는 정체전선의 위치와 저기압의 이동경로에 따라 시점과 집중되는 지역이 변경될 가능성이 있으니, 앞으로 발표되는 기상정보를 참고하기 바랍니다. ]]>
</wf>
</header>
<body>
<location wl_ver="3">
<province>서울ㆍ인천ㆍ경기도</province>
<city>서울</city>
<data>
<mode>A02</mode>
<tmEf>2020-07-25 00:00</tmEf>
<wf>구름많고 비</wf>
<tmn>22</tmn>
<tmx>29</tmx>
<reliability/>
<rnSt>60</rnSt>
</data>
<data>
<mode>A02</mode>
<tmEf>2020-07-25 12:00</tmEf>
<wf>구름많고 비</wf>
<tmn>22</tmn>
<tmx>29</tmx>
<reliability/>
<rnSt>70</rnSt>
</data>
<data>
<mode>A02</mode>
<tmEf>2020-07-26 00:00</tmEf>
<wf>구름많고 비</wf>
<tmn>21</tmn>
<tmx>29</tmx>
<reliability/>
<rnSt>70</rnSt>
</data>
<data>
<mode>A02</mode>
<tmEf>2020-07-26 12:00</tmEf>
<wf>흐림</wf>
<tmn>21</tmn>
<tmx>29</tmx>
<reliability/>
<rnSt>40</rnSt>
</data>
<data>
<mode>A02</mode>
<tmEf>2020-07-27 00:00</tmEf>
<wf>흐림</wf>
<tmn>22</tmn>
<tmx>29</tmx>
<reliability/>
<rnSt>40</rnSt>
</data>
<data>
<mode>A02</mode>
<tmEf>2020-07-27 12:00</tmEf>
<wf>흐리고 비</wf>
<tmn>22</tmn>
<tmx>29</tmx>
<reliability/>
<rnSt>90</rnSt>
</data>
<data>
<mode>A02</mode>
<tmEf>2020-07-28 00:00</tmEf>
<wf>흐리고 비</wf>
<tmn>22</tmn>
<tmx>28</tmx>
<reliability/>
<rnSt>70</rnSt>
</data>
<data>
<mode>A02</mode>
<tmEf>2020-07-28 12:00</tmEf>
<wf>흐리고 비</wf>
<tmn>22</tmn>
<tmx>28</tmx>
<reliability/>
<rnSt>60</rnSt>
</data>
<data>
<mode>A02</mode>
<tmEf>2020-07-29 00:00</tmEf>
<wf>흐리고 비</wf>
<tmn>23</tmn>
<tmx>29</tmx>
<reliability/>
<rnSt>60</rnSt>
</data>
<data>
<mode>A02</mode>
<tmEf>2020-07-29 12:00</tmEf>
<wf>흐리고 비</wf>
<tmn>23</tmn>
<tmx>29</tmx>
<reliability/>
<rnSt>60</rnSt>
</data>
<data>
<mode>A01</mode>
<tmEf>2020-07-30 00:00</tmEf>
<wf>흐리고 비</wf>
<tmn>23</tmn>
<tmx>30</tmx>
<reliability/>
<rnSt>80</rnSt>
</data>
<data>
<mode>A01</mode>
<tmEf>2020-07-31 00:00</tmEf>
<wf>흐림</wf>
<tmn>23</tmn>
<tmx>29</tmx>
<reliability/>
<rnSt>40</rnSt>
</data>
<data>
<mode>A01</mode>
<tmEf>2020-08-01 00:00</tmEf>
<wf>흐리고 비</wf>
<tmn>23</tmn>
<tmx>28</tmx>
<reliability/>
<rnSt>80</rnSt>
</data>
</location>
<location wl_ver="3">
...
</location>
</body>
</description>
</item>
</channel>
</rss>
- 기상청에서 받은 html파일을 보면 rss 태그가 있는것을 볼 수 있다.

- RSS란 무엇인가?
RSS - 나무위키
RSS: Rich Site Summary 또는 Really Simple Syndication. 舊 RDF Site Summary. RSS는, 어떤 사이트에 새로운 콘텐츠가 올라왔을 때 해당 사이트에 방문하지 않고, RSS서비스를 통해 리더 한 곳에서 그 콘텐츠를 이용�
namu.wiki
- find, find_all을 사용해 title태그값, wf태그값 뽑아내기
import requests
from bs4 import BeautifulSoup

url = "http://www.kma.go.kr/weather/forecast/mid-term-rss3.jsp"

res = requests.get(url)
html = res.text
soup = BeautifulSoup(html, 'html.parser')
print(soup.find('title').string)
print(soup.find_all('title'))
print('---------------------------')
for title in soup.find_all('title'):
    print(title.text)
print('---------------------------')
print(soup.find('wf').string)

- find, find_all을 사용해 header태그의 자식인 wf값 뽑아내기
for tag in soup.find_all('header'):
    print(tag.find('wf').string)

- location가 wl_ver속성이 3의 값을 가진 첫번째 태그의 자식인 province와 city태그 값 뽑아내기
title = soup.find('location',attrs={'wl_ver':'3'}).find('province').text
city = soup.find('location',attrs={'wl_ver':'3'}).find('city').text
print(title)
print(city)

- location가 wl_ver속성이 3의 값을 가진 첫번째 태그의 자식인 data값들 json으로 만들기
# 1개의 data는 dict에 저장하고, dict를 list에 저장한다.

data_tags = soup.find('location', attrs={'wl_ver':'3'}).find_all('data')
dict_tags = {}
list_tags = []
for tag in data_tags:
    mode = tag.find('mode').text
    dict_tags['mode'] = mode
    tmEf = tag.find('tmef').text
    dict_tags['tmef'] = tmEf
    wf = tag.find('wf').text
    dict_tags['wf'] = wf
    tmn = tag.find('tmn').text
    dict_tags['tmn'] = tmn
    tmx = tag.find('tmx').text
    dict_tags['tmx'] = tmx
    rnSt = tag.find('rnst').text
    dict_tags['rnst'] = rnSt
    list_tags.append(dict_tags)
    dict_tags = {}

print(list_tags)

- 이제 모든 location태그에 있는 값들을 json으로 만들어 보자!!!!
- 결과는 다음과 같은 weather.txt 와 같은 형태로 나와야 성공~!!
[lambda함수를 만들어 간단하게 연습해본 코드]
# JSON으로 변경

#태그 이름에 따른 값을 리턴해주는 함수
find_all_location = lambda val : soup.find('location', attrs={'wl_ver':'3'}).find_all(val)
find_location = lambda val2 : soup.find('location', attrs={'wl_ver':'3'}).find(val2).text


dict_tags = {}
list_tags = []
data_tags = find_all_location('data')
for tag in data_tags:
    mode = tag.find('mode').text
    dict_tags['mode'] = mode
    tmEf = tag.find('tmef').text
    dict_tags['tmef'] = tmEf
    wf = tag.find('wf').text
    dict_tags['wf'] = wf
    tmn = tag.find('tmn').text
    dict_tags['tmn'] = tmn
    tmx = tag.find('tmx').text
    dict_tags['tmx'] = tmx
    rnSt = tag.find('rnst').text
    dict_tags['rnst'] = rnSt
    list_tags.append(dict_tags)
    dict_tags = {}

dict_province = {}
list_province = []
province = find_location('province')
city = find_location('city')
dict_province['province'] = province
dict_province['city'] = city
dict_province['data'] = list_tags
list_province.append(dict_province)

soup.find_all('location')
[수녕 최종 풀이]
dict_tags = {}
list_tags = []
dict_location_tag = {}
list_location_tag = []

for location_tag in soup.find_all('location'):
    dict_location_tag['province'] = location_tag.find('province').text
    dict_location_tag['city'] = location_tag.find('city').text
    for tag in location_tag.find_all('data'):
        dict_tags['mode'] = tag.find('mode').text
        dict_tags['tmef'] = tag.find('tmef').text
        dict_tags['wf'] = tag.find('wf').text
        dict_tags['tmn'] = tag.find('tmn').text
        dict_tags['tmx'] = tag.find('tmx').text
        dict_tags['rnst'] = tag.find('rnst').text
        list_tags.append(dict_tags)
        dict_tags = {}
    list_tags = []

    dict_location_tag['data'] = list_tags
    list_location_tag.append(dict_location_tag)
    dict_location_tag = {}
print(list_location_tag)
[튜닝 후]
list_location_tag = []
for location_tag in soup.find_all('location'):

    dict_location_tag = {}
    dict_location_tag['province'] = location_tag.find('province').text
    dict_location_tag['city'] = location_tag.find('city').text
    list_tags = []
    for tag in location_tag.find_all('data'):
        dict_tags = {}
        dict_tags['mode'] = tag.find('mode').text
        dict_tags['tmef'] = tag.find('tmef').text
        dict_tags['wf'] = tag.find('wf').text
        dict_tags['tmn'] = tag.find('tmn').text
        dict_tags['tmx'] = tag.find('tmx').text
        dict_tags['rnst'] = tag.find('rnst').text
        list_tags.append(dict_tags)

    dict_location_tag['data'] = list_tags
    list_location_tag.append(dict_location_tag)

print(list_location_tag)
[json파일로 저장]
# JSON파일로 저장
import json
json_data = list_location_tag
with open("data/data.json","w") as file:
    json.dump(json_data, file)

[json파일 불러오기]
import json
with open("data/data.json","r",encoding="utf-8") as file:
    contents = file.read()
    weather_data = json.loads(contents)

weather_data

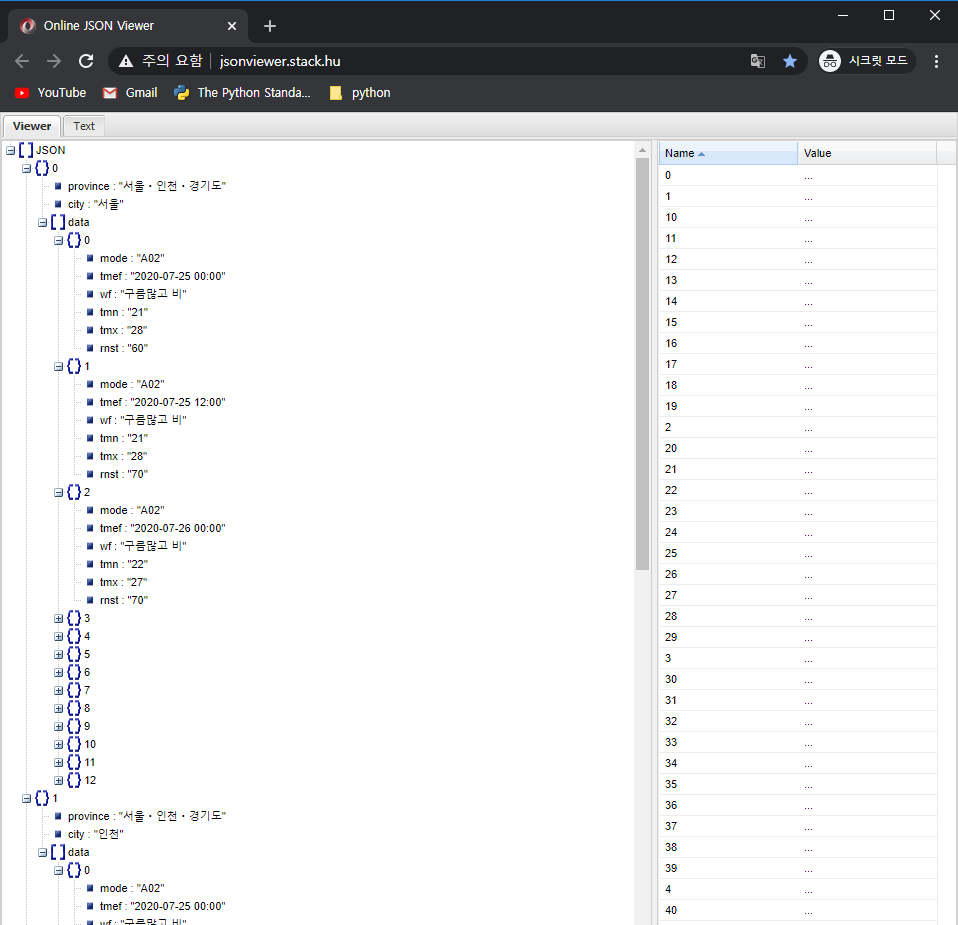
- JSON 값을 넣어 결과를 확인할 수 있는 페이지 - JSON Viewer
Online JSON Viewer
jsonviewer.stack.hu
- JSON Viewer에 작성한 코드의 json 결과값을 TEXT 탭에 넣은 뒤 VIEWER로 확인한다.
5. Pandas활용한 행정구역정보 분석
1) read_csv() 함수
- csv file읽기
- head(), tail() 함수로 일부 데이터 가져오기
- columns, index, shape, info()로 meta 정보 확인
- describe(), max(), min(), mean() 집계함수
- 컬럼명을 변경하고, 특정 컬럼을 인덱스로 변경하기
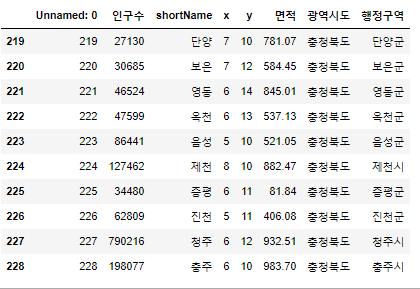
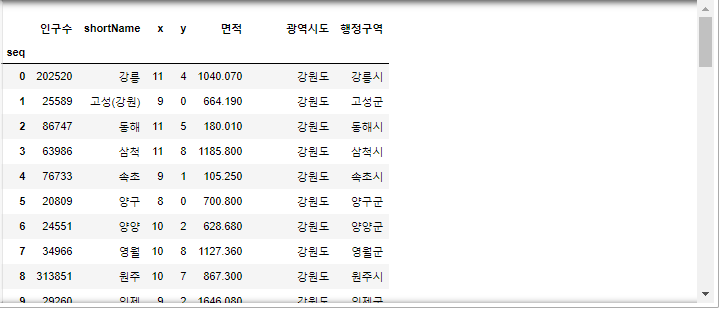
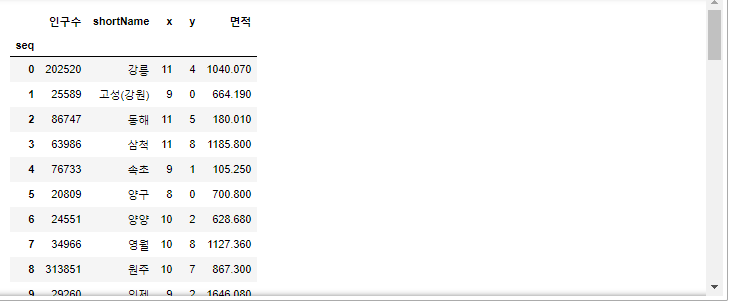
- data/data_draw_korea.csv파일 사용
- jupyter에서 해당 csv파일을 열면 다음과 같다.

- pandas가 설치되어있는지 확인
!pip show pandas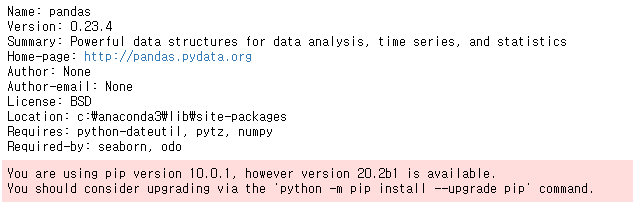
- data/data_draw_korea.csv파일을 읽은 후, 데이터를 3개 출력해본다.
import pandas as pd
data = pd.read_csv('data/data_draw_korea.csv')
#print(type(data), data)
# head() 함수의 default=5
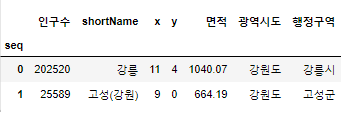
data.head(3)

- data.tail : 뒤에서 n개 출력(default : 5개)
data.tail()

- data.tail(출력하고싶은 갯수)
data.tail(10)
- 컬럼명, 인덱스, 행/열 총 갯수 조회
# 컬럼명
print(data.columns)
print('--------------------')
# 인덱스
print(data.index)
print('--------------------')
# 몇행 몇열
print(data.shape)
- data.info()
# info() - DataFrame의 meta정보
data.info()

- data.describe() : 집계함수
# describe() - 집계함수(문자열 타입 빼고 숫자타입에 대해서만)
data.describe()
- 컬럼별 최대, 최소, 평균값 구하기
# 인구수 컬럼값의 최대, 최소, 평균
print(type(data['인구수']))
print(data['인구수'].head())
print('최소',data['인구수'].min())
print('평균',data['인구수'].mean())
print('최대',data['인구수'].max())

- 컬럼 이름 변경
# 컬럼명 변경
data = data.rename(columns={'Unnamed: 0':'seq'})
data.head(2)

- 컬럼명 -> index 변경
# seq컬럼을 index로 변경하기
data = data.set_index('seq')
data.head(2)
2) 특정 행과 열을 선택하기
- loc[] 사용, iloc[] 사용(원하는 index줘서 선택)
- 특정 열을 선택, Slicing으로 열을 선택
- 특정 행을 선택, Slicing으로 행을 선택
- boolean indexing - 조건식을 만족하는 행을 선택
- loc를 통해 전체 행, 열 선택
data.loc[:]
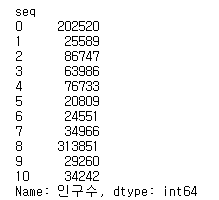
- index가 10인 행까지, 인구수 컬럼만 출력
#data.loc[행,열]
data.loc[:10,'인구수']
# print(type(data.loc[:10,'인구수'])) ## 컬럼이 1개면 <class 'pandas.core.series.Series'>
print(data.loc[:10,'인구수'])
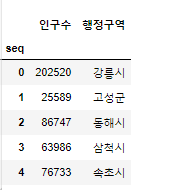
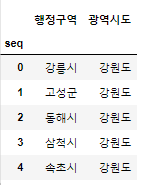
- 인구수, 행정구역 컬럼만 출력
# data.loc[행,열]
# 인구수, 행정구역
data.loc[:,['인구수','행정구역']].head() # 컬럼이 2개 이상이면 DataFrame
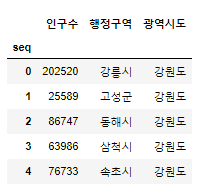
- 인구수, 행정구역, 광역시도 컬럼만 출력
# data.loc[행,열]
# 인구수, 행정구역, 광역시도
# 특정 열을 여러개 선택할 떄는 컬럼명을 [] 로 감싸준다.
col_list = ['인구수','행정구역','광역시도']
data.loc[:,col_list].head()
- 특정구간을 지정할 수 있는 slicing
# 인구수 컬럼부터 면적 컬럼까지 - slicing
# 컬럼의 특정 구간을 주려면 : 를 사용한다.
data.loc[:,'인구수':'면적']
- 1개 행 선택
# 1개 행만 선택
data.loc[0,:]

- 특정 행 선택
# 여러개의 특정 행
data.loc[[0,3,4],:]

- 특정구간을 지정할 수 있는 slicing
# 여러개의 행 (구간 - slicing)
data.loc[0:3,:] #0:3:1

- 특정구간을 지정할 수 있는 slicing - 2칸씩 점프하도록 설정가능
# 여러개의 행 (구간 - slicing) 2칸씩 점프
data.loc[0:10:2,:]

- 연습문제1
# 연습문제~~!!
# 1. 20개의 행, '행정구역', '광역시도' 가져오기
data.loc[0:19,['행정구역','광역시도']].head()
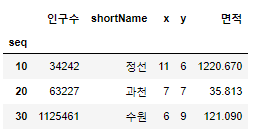
- 연습문제2
# 연습문제~~!!
# 2. 10, 20, 30 행 '인구수' 부터 '면적' 까지 가져오기
data.loc[[10,20,30],'인구수':'면적']
* 오늘숙제
- Ajax란?
- 기존 웹과 Ajax방식의 웹 차이점 알아오기
- user_agent뭔지 찾아보기
'Python > Python 웹 크롤링' 카테고리의 다른 글
| 파이썬 OpenAPI_07월 24일 (0) | 2020.07.24 |
|---|---|
| 파이썬 OpenAPI_07월 23일 (0) | 2020.07.23 |
| 파이썬 OpenAPI_07월 21일 (0) | 2020.07.21 |
| 파이썬 OpenAPI_07월 20일 (0) | 2020.07.20 |
| 파이썬 수업_07월 17일 (0) | 2020.07.17 |