
<7월 20일(월) 할 일>
1. Anaconda 설치
: python 기본 toolkit + 외부 라이브러리
: 관리자 권한으로 실행
: path 우선순위 변경
2. Editor
: Jupiter Notebook 사용
CLI(Command Line Interface) 방식 : python idle
>>>
: ipython 을 기반으로 해서 Browser 상에 사용하는 에디터
: chrome브라우저가 기본 브라우저로 설정되어 있어야 함
- 파일 - Pickle
- Built - in module
- 파일 자체가 텍스트가 아닌 바이너리 파일로 저장됨(mode = wb)
- dump함수 - 피클에 있는 저장함수
- load함수 - 저장된 파일을 불러오는 함수
- 언제사용? object를 파일로 저장했다 불러올 경우
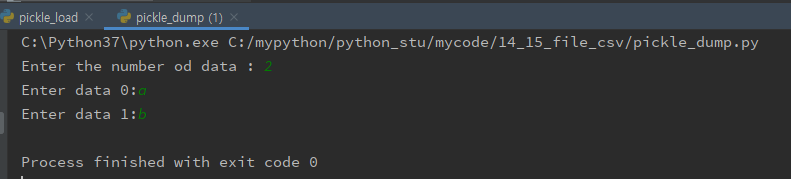
[pickle_dump.py]
import pickle

# 사용자로 부터 문자열을 몇번 입력할지를 숫자로 입력받는다.
number_of_data = int(input('Enter the number od data : '))
# 입력받은 데이터를 저장할 list선언
data = []

# 입력받은 숫자 만큼 for loop으로 문자열을 입력을 받는다.
for idx in range(number_of_data):
    raw = input('Enter data ' + str(idx) + ':')
    data.append(raw)

# pickle의 dump() 함수를 이용해서 문자열을 저장한 list를 저장한다.
file = open('important', 'wb')
pickle.dump(data, file)
file.close()
[pickle_load.py]
# 저장된 data를 읽어오기
import pickle

file = open('important', 'rb')
data = pickle.load(file)
file.close()

print('Showing the pickled data')
for idx, item in enumerate(data):
    print(idx, item)

<Anaconda3 설치 방법>
- Anaconda3-5.3.1-Windows-x86_64.exe 설치
https://www.anaconda.com/products/individual#download-section
Individual Edition
🐍 Open Source Anaconda Individual Edition is the world’s most popular Python distribution platform with over 20 million users worldwide. You can trust in our long-term commitment to supporting the Anaconda open-source ecosystem, the platform of choice
www.anaconda.com
- path 설정
: 이전에 python path를 설정해 두었다면, 일단 python path를 삭제한다.(나중에 다시 설정하면 됨)
<Anaconda3 설치 후 확인해야할 것들>
1. requests : http client
https://pypi.org/project/requests/
requests
Python HTTP for Humans.
pypi.org
https://requests.readthedocs.io/en/master/
Requests: HTTP for Humans™ — Requests 2.24.0 documentation
Requests: HTTP for Humans™ Release v2.24.0. (Installation) Requests is an elegant and simple HTTP library for Python, built for human beings. Behold, the power of Requests: >>> r = requests.get('https://api.github.com/user', auth=('user', 'pass')) >>> r.
requests.readthedocs.io

2. beautifulsoup : html, xml 데이터 parsing
- parsing
2-1. 정규표현식(regular expression) 사용
2-2. beautifulsoup사용
https://pypi.org/project/beautifulsoup4/#description
beautifulsoup4
Screen-scraping library
pypi.org
https://www.crummy.com/software/BeautifulSoup/bs4/doc/
Beautiful Soup Documentation — Beautiful Soup 4.9.0 documentation
Non-pretty printing If you just want a string, with no fancy formatting, you can call unicode() or str() on a BeautifulSoup object, or a Tag within it: str(soup) # ' I linked to example.com ' unicode(soup.a) # u' I linked to example.com ' The str() functio
www.crummy.com

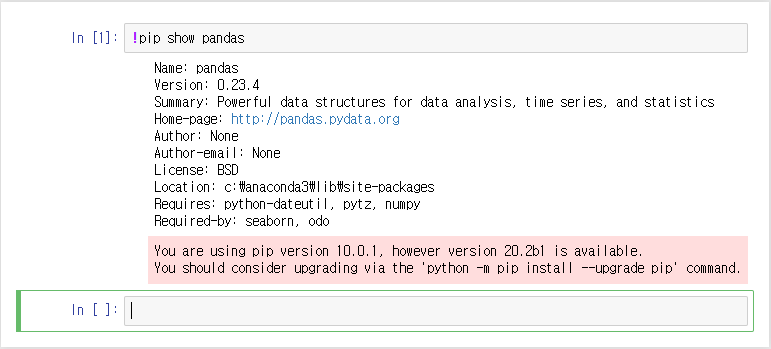
3. pandas : tablet data(표데이터) 처리 - 데이터 분석, DB저장, 시각화 연동
https://pypi.org/project/pandas/
pandas
Powerful data structures for data analysis, time series, and statistics
pypi.org
https://pandas.pydata.org/docs/user_guide/index.html
User Guide — pandas 1.0.5 documentation
pandas.pydata.org
https://dataitgirls2.github.io/10minutes2pandas/
판다스 10분 완성 / 10 Minutes to Pandas
Pandas 10분 완성 역자 주 : 본 자료는 10 Minutes to Pandas (하단 원문 링크 참조)의 한글 번역 자료로, 번역은 데잇걸즈2 프로그램 교육생 모두가 함께 진행하였습니다. 데잇걸즈2는 과학기술정보통신��
dataitgirls2.github.io

4. matplotlib : visualization(시각화)
https://pypi.org/project/matplotlib/
matplotlib
Python plotting package
pypi.org
Matplotlib: Python plotting — Matplotlib 3.3.0 documentation
matplotlib.org
https://matplotlib.org/gallery/index.html
Gallery — Matplotlib 3.3.0 documentation
Gallery This gallery contains examples of the many things you can do with Matplotlib. Click on any image to see the full image and source code. For longer tutorials, see our tutorials page. You can also find external resources and a FAQ in our user guide.
matplotlib.org

5. seaborn : visualization(시각화)
**Seaborn is a library for making statistical graphics in Python. It is built on top of matplotlib and closely integrated with pandas data structures.
https://pypi.org/project/seaborn/
seaborn
seaborn: statistical data visualization
pypi.org
seaborn: statistical data visualization — seaborn 0.10.1 documentation
Seaborn is a Python data visualization library based on matplotlib. It provides a high-level interface for drawing attractive and informative statistical graphics. For a brief introduction to the ideas behind the library, you can read the introductory note
seaborn.pydata.org
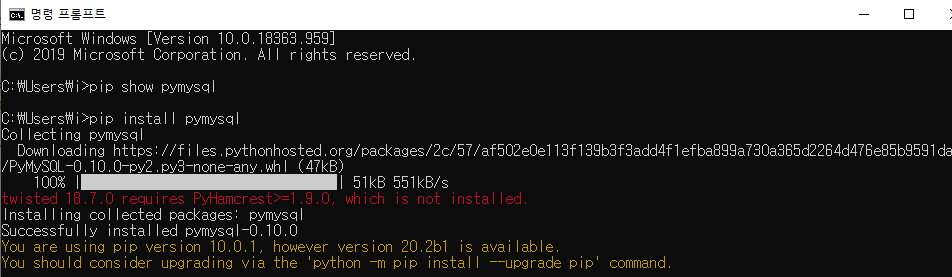
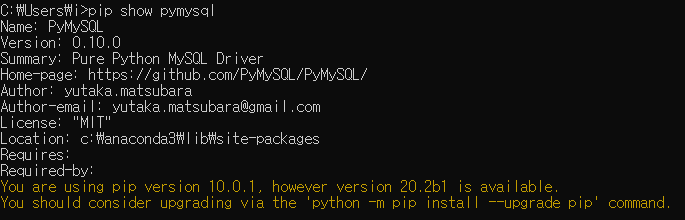
6. pymysql : mysql db driver
** pymysql은 Anaconda3설치해도 없으므로 따로 설치해야함
https://pypi.org/project/PyMySQL/
PyMySQL
Pure Python MySQL Driver
pypi.org
https://github.com/PyMySQL/PyMySQL/
PyMySQL/PyMySQL
Pure Python MySQL Client. Contribute to PyMySQL/PyMySQL development by creating an account on GitHub.
github.com
7. pymongo : mongodb driver
https://pypi.org/project/pymongo/
pymongo
Python driver for MongoDB
pypi.org

8. sqlalchemy : ORM(Object Relational Mapping) 기능
- tabular data : DateFrame 객체
- 표데이터를 자동으로 테이블로 만들어줌
- ORM Rule :
class <=> Table
object <=> Row(Record)
variable <=> Column
https://pypi.org/project/SQLAlchemy/
SQLAlchemy
Database Abstraction Library
pypi.org
SQLAlchemy - The Database Toolkit for Python
The Python SQL Toolkit and Object Relational Mapper SQLAlchemy is the Python SQL toolkit and Object Relational Mapper that gives application developers the full power and flexibility of SQL. It provides a full suite of well known enterprise-level persisten
www.sqlalchemy.org
9. Jupyter Notebook (jupyter lab)
https://pypi.org/project/jupyter/
jupyter
Jupyter metapackage. Install all the Jupyter components in one go.
pypi.org
https://jupyter-notebook.readthedocs.io/en/stable/
The Jupyter Notebook — Jupyter Notebook 6.0.3 documentation
© Copyright 2015, Jupyter Team, https://jupyter.org Revision 85f1b9f7.
jupyter-notebook.readthedocs.io

<실습 시작!!>
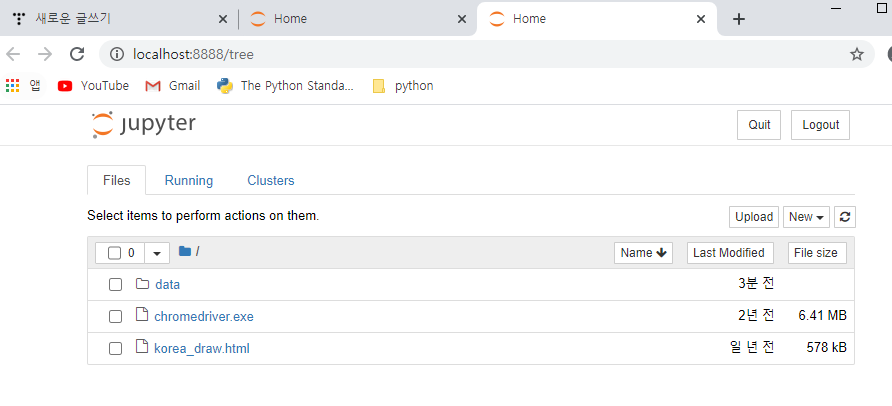
1. 자신이 주피터 노트북을 실행할 파일 위치로 이동한 뒤 경로를 복사한다.

2. cmd 창을 띄운 뒤 > cd 복사한경로 > jupyter notebook 실행 (**단 브라우저 기본 설정이 크롬으로 되어있어야함)
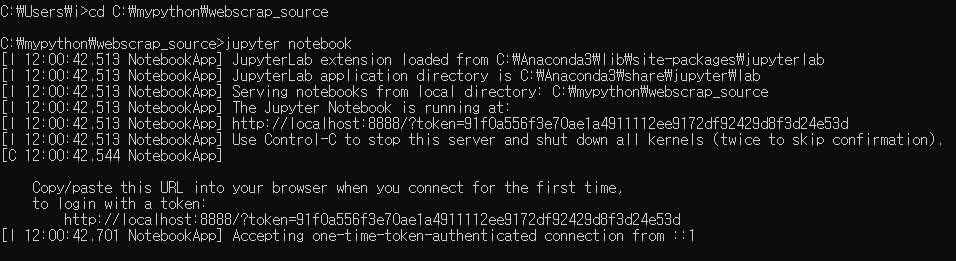
3. 명령 실행후 해당 경로로 주피터 노트북이 실행된다.
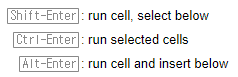
4. 명령 창에 실행할 명령어를 친 뒤 Alt + Enter 또는 Ctrl + Enter를 입력하면 실행된다.

- 마크다운
: 문서작업을 할 때 사용하는 표식(?)
https://github.com/adam-p/markdown-here/wiki/Markdown-Cheatsheet
adam-p/markdown-here
Google Chrome, Firefox, and Thunderbird extension that lets you write email in Markdown and render it before sending. - adam-p/markdown-here
github.com
<Web Scraping>
1. naver 뉴스 제목 검색
2. naver API : 파파고 번역 서비스
3. naver 웹툰 다운로드 & 업로드
- requests 연습
4. 기상청 날씨데이터 검색
- beautifulsoup연습
5. 행정구역 정보 csv 데이터
- Pandas, matplotlib, seaborn
6. Melon 100차트
7. 국회의원 정보 검색
- requests, beautifulsoup, pandas, matplotlib, seaborn, pymysql(MariaDB), sqlalchemy
8. 팟빵
- mp4 다운로드
9. MongoDB
- cine21 영화, 배우 정보 검색
10. 머신러닝
0. 사전 지식
*http protocol (http method)
- GET : URL에 정보 포함(보여도 상관없는 정보) - 조회
- POST : URL에 정보 포함되지 않음(주민번호, 카드번호 전달 등), body stream에 데이터 담아서 보내는 방식 - 등록, 갱신
* status code
https://developer.mozilla.org/ko/docs/Web/HTTP/Status
HTTP 상태 코드
번역이 완료되지 않았습니다. Please help translate this article from English HTTP 응답 상태 코드는 특정 HTTP 요청이 성공적으로 완료되었는지 알려줍니다. 응답은 5개의 그룹으로 나누어집니다: 정보를 제
developer.mozilla.org
* cookie, session
- http 프로토콜은 connectionless. why? 사용자가 너무 많기때문에 사용자마다 서버연결하면 서버 터져^^
- cookie : 클라이언트 쪽에만 저장되어있는 것
- session : was같은 서버에 저장되어져 있는 것
* CSS Selector
<div id="myDiv">
</div>
<div class="myClass">
</div>
<ul>
<li>aaa</li>
<li>bbb</li>
</ul>
<a href='www.naver.com'></a>
<img src=''>
1) Tag Selector
: tag명으로 특정 tag선택
soup.select('li')
2) ID Selector #
soup.select('#myDiv')
3) class Selector .
soup.select('div.myClass')
4) attribute Selector []
soup.select("a[href='www.naver.com']")
*= : 부분 매칭
^= : 시작
$= : 종료
1. naver 뉴스 제목 검색
네이버 뉴스
정치, 경제, 사회, 생활/문화, 세계, IT/과학 등 언론사별, 분야별 뉴스 기사 제공
news.naver.com
- requests, beautifulsoup 사용
- css selector - 속성 선택자 사용
#!/usr/bin/env python
# coding: utf-8

# ### 1. Nhn 뉴스 제목 검색
# * requests, beautifulsoup 사용
# * css selector - 속성 선택자 사용

# In[1]:


import requests
from bs4 import BeautifulSoup
from urllib.parse import urljoin


# In[2]:


url = 'https://news.naver.com/'
response = requests.get(url)
print('status_code : ' , response.status_code)
print('response header : ', response.headers)
print('content-type : ', response.headers['content-type'])


# In[3]:


# 페이지 소스보기 한 것과 같은 내용 가져옴
#응답 데이터 html 텍스트
html = response.text


# In[7]:


# BeautifulSoup 생성
soup = BeautifulSoup(html, 'html.parser')
tag_list = soup.select("a[href*='read.nhn']")
print(type(tag_list), len(tag_list))
for idx, a_tag in enumerate(tag_list):
    #print(a_tag)#<class 'bs4.element.Tag'>
    title = a_tag.text.strip()#기사 제목 가져오기
    link = urljoin(url, a_tag['href'])#기사 링크 가져오기

    print(idx, title, link)
    print('----------------------------------------')


# ### 2. Nhn 번역서비스 Papago 사용하기
# * urllib를 사용하기
# * requests를 사용하기

# In[11]:


# 네이버 Papago NMT API 예제
# urllib를 사용하기
import os
import sys
import urllib.request

client_id = "Zo1vTslyKxKYskf_qfUk"
client_secret = "X5kGpbWEbv"

encText = urllib.parse.quote("Yesterday all my troubles seemed so far away.")
# query string
data = "source=en&target=ko&text=" + encText
url = "https://openapi.naver.com/v1/papago/n2mt"

request = urllib.request.Request(url)
request.add_header("X-Naver-Client-Id",client_id)
request.add_header("X-Naver-Client-Secret",client_secret)

response = urllib.request.urlopen(request, data=data.encode("utf-8"))
rescode = response.getcode()
if(rescode==200):
    response_body = response.read()
    print(response_body.decode('utf-8'))
else:
    print("Error Code:" + rescode)


# ### requests 예제로 변환하기

# In[22]:


import requests

client_id = "Zo1vTslyKxKYskf_qfUk"
client_secret = "X5kGpbWEbv"
url = "https://openapi.naver.com/v1/papago/n2mt"
encText = "Yesterday all my troubles seemed so far away."

req_headers = {"X-Naver-Client-Id":client_id,
               "X-Naver-Client-Secret":client_secret
              }
params = {'source':'en',
          'target':'ko',
          'text':encText
         }
response = requests.post(url, headers=req_headers, data=params)
print('응답헤더값들', response.headers)
print('요청헤더값들', response.request.headers)
print('status code : ', response.status_code)

if response.status_code == 200:
    print(response.text)
else:
    print('Error code : ',response.status_code)


# In[25]:


myjson = response.json()
print(type(myjson), myjson)


# In[27]:


myjson['message']['result']['translatedText']


# ### requests의 Request, Session객체를 사용하는 방식으로 변환

# In[33]:


import requests
# Request와 Session클래스 를 import
from requests import Request, Session

client_id = "Zo1vTslyKxKYskf_qfUk"
client_secret = "X5kGpbWEbv"
url = "https://openapi.naver.com/v1/papago/n2mt"
encText = "Yesterday all my troubles seemed so far away."

req_headers = {"X-Naver-Client-Id":client_id,
               "X-Naver-Client-Secret":client_secret
              }
params = {'source':'en',
          'target':'ko',
          'text':encText
         }

# Ssssion 객체 생성
session = Session()

# Request 객체 생성
request = Request('POST',url, headers=req_headers, data=params)
# request의 prepare() 함수 호출
prepped = request.prepare()

# session의 send() 함수를 호출해서 서버에 요청을 전달
response = session.send(prepped)

print('응답헤더값들', response.headers)
print('요청헤더값들', response.request.headers)
print('status code : ', response.status_code)

if response.status_code == 200:
    print(response.json()['message']['result']['translatedText'])
else:
    print('Error code : ',response.status_code)
2. papago API 키값
Papago NMT API 개발 가이드
Papago NMT API 개발 가이드 - 파파고에 적용된 Naver Neural Machine Translator를 이용한 번역 API.
developers.naver.com
- 네이버 파파고 오픈 API 키값
client_id = "5sfTzHnrTT64IxBAn9CE"
client_secret = "ECiex2ErDf"
#!/usr/bin/env python
# coding: utf-8

# ### data/yesterday.txt 번역
# 1. yesterday.txt파일 읽기
# 2. requests로 http통신
# 3. 번역된 결과를 파일로 쓰기

# In[11]:


from requests import Request, Session

# yesterday.txt파일 읽기
def get_text_list():
    result_list = []
    with open('data/yesterday.txt','r', encoding='utf-8') as file:
        contents = file.read()
        result_list = contents.split('\n')
    return result_list

# yesterday.txt파일 읽기
def save_to_file(my_list):
    with open('data/yesterday_trans.txt','w', encoding='utf-8') as file:
        file.writelines(my_list)

# requests로 http통신
def main():
    session = Session()
    client_id = "5sfTzHnrTT64IxBAn9CE"
    client_secret = "ECiex2ErDf"
    url = "https://openapi.naver.com/v1/papago/n2mt"

    req_headers = {"X-Naver-Client-Id":client_id,
                   "X-Naver-Client-Secret":client_secret
    }

    lyric_list = get_text_list()
    # list comprehension
    lyric_list = [lyric for lyric in lyric_list if len(lyric)!= 0]
    print(lyric_list, len(lyric_list))

    trans_list = []
    for en_text in lyric_list:
        params = {'source':'en',
                  'target':'ko',
                  'text':en_text
        }
        print(en_text)

        req = Request('POST', url, data=params, headers=req_headers)
        prepared = req.prepare()
        res = session.send(prepared)
        print(res.status_code)
        try:
            ko_text = res.json()['message']['result']['translatedText']
        except Exception as err:
            print(err)
        else:
            print(ko_text)

        trans_list.append(en_text+'\n')
        trans_list.append(ko_text+'\n')

    save_to_file(trans_list)
    print('번역종료')

main()
- 주피터 소스코드 html파일
'Python > Python 웹 크롤링' 카테고리의 다른 글
| 파이썬 OpenAPI_07월 22일 (0) | 2020.07.22 |
|---|---|
| 파이썬 OpenAPI_07월 21일 (0) | 2020.07.21 |
| 파이썬 수업_07월 17일 (0) | 2020.07.17 |
| 파이썬 수업_07월 16일 (0) | 2020.07.16 |
| 파이썬 수업_07월15일 (0) | 2020.07.15 |